19 July 2014

Almond-Crusted Fish

photo-13

Over two years ago, when we left for Algiers, I set aside a small batch of a our nicer cooking equipment and put it in storage. I figured some of this stuff was good quality, and I wanted to spare it a 4 month trans-Atlantic voyage, and I knew that at some point we'd be coming back to America and might need some kitchen things on hand.

Now granted, this was actually a very good idea since, while we still have no furniture, we have plenty of plates and forks and things. But I would probably be remiss if I didn't mention those plates and forks are my mother's china and silver, and all my pans are copper. Along with an impractically large mandoline, a fish poacher, and hand-blown glass tumblers, let's just say we don't have the most practical of kitchenware.

(Side note on our copper pots: They are all from E. Dehillerin and my mother bought them in France in the SIXTIES people. I few years ago I sent them off to these amazing people in Colorado to have the insides re-tinned, since they had worn away over time. They did an amazing job, they even restored the little Dehillerin labels in the copper, and I love them!)

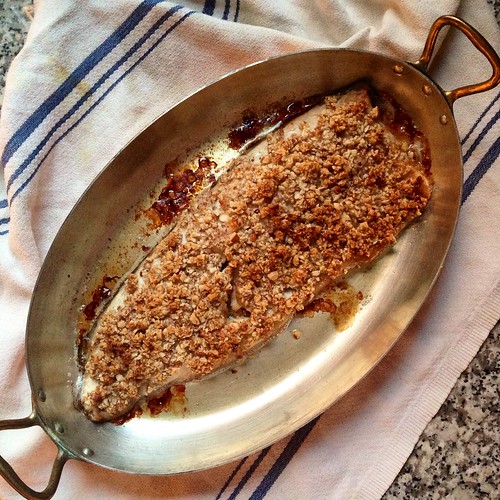
I've been using the copper pans for everything from roasting fish to searing skirt steaks to great effect. (Given our lack of equipment, meals are pretty simple around here.) One night I reached in the cabinet and chopped up a bunch of almonds to put on top of a fillet of fish I was roasting. I just mixed the chopped almonds with some butter, dabbed over the fish, and baked the whole thing and we haven't stopped talking about it since. If this blog is any testament, I'm not usually one for the "3-Ingredient Recipe" schtick, but this is dead simple and really delicious.

The only stipulation I will make is that you need to chop those almonds by hand. One, I think you get more variation in texture by chopping by hand, the fine bits and the coarse bits. Two, it's the only thing you have to do for this recipe! All you have to do is spend a few minutes chopping and the rest is basically done. Plus, it's a chance to work on your chopping skills. So, what do you readers make when you only have a few basic kitchen implements around?

Almond-Crusted Fish
If you want to get fancy, adding a bit of chopped thyme to the topping, or alternately some chile flakes or other spices, could be fun.

1 heaped cup skin-on whole raw almonds
2 tablespoons butter, room temperature
salt
1 large fillet of whitefish, about 1 lb (or sable fish, lake trout, etc)
lemon wedges

1. Preheat the oven to 425F. Grease a casserole dish with some butter. Place your fish in the pan and sprinkle the top liberally with salt.
2. Chop up the almonds with a large chefs knife. You want to chop the almonds so that some of the almonds are totally pulverized to almost a powder, but you still have quite a few chunks of almond left. The variation in texture is key.
3. Transfer the almonds to a bowl and add the butter and a good pinch of salt. Rub the butter and almonds together until the mixture resembles a crumble topping. Dab the crumble topping all over the fish so that the fish is totally covered in the almond mixture.
4. Transfer to the oven. Bake the fish for 15-18 minutes, or until the almond topping is nicely toasted on top. It's a bit hard to tell if the fish is done since you can't see it, but press gently on the center of the fish, it should be semi-firm. Serve with lemon wedges.

14 July 2014

Algerian Kesra Bread

DSC_0022
I am writing this post from a folding chair and a card table in our new (!) Chicago flat, in a rather dimly lit empty room that one day will be our library. Aside from our bed, and the folding chairs, we have precisely zero furniture, and yet I couldn't be more thrilled with our new home. Meanwhile, our stuff is floating on a Maersk ship somewhere out in the Atlantic Ocean, working its way infintessimally towards us. Paul and I are convinced that not having furniture means you burn a whole lot more calories not-sitting everyday (the by-product of not having furniture), which is a great excuse for regular trips to get ice cream.

Meanwhile, all of my GRAND SUMMER PLANS have gone the way of Brazil's world cup dreams. Which is to say, I've been doing a whole lotta not much these days. And if you think several weeks of unstructured vacation sounds great, then clearly you have not met me. I need structure, I crave schedules and order and charts and routine.

Naturally, knowing I would have this long summer break, I did what people like me do, which is I created the Perfect Summer Schedule. I would take some Arabic classes (my Algerian patois is not going to serve me well in our next assignment), I would work on our new home, sorting through our old stuff that's in storage. I would update the design of this blog and go on a trip to visit my family.

Of course, this being the Perfect Summer Schedule that I had meticulously planned in advance, it was bound to fail. Our home closing got delayed, which meant rearranging my training schedule, which then threw everything else off course, as I should have expected. So instead, I did what any self-respecting world traveler does: I watched the World Cup.

DSC_0018

You guys, as someone who was obsessively supporting both Argentina and Algeria, can we take a moment to recognize the utter stress and heartbreak these past 4 weeks have been?

Thank you.

I also did what any new-home owner does, that is: design my dream kitchen. Realize I can't afford my dream kitchen. Think we really need somewhere to sit (like a couch). Obsess over looking at couches. Deal with the Comunistcast guy. Learn how to fix plumbing, since apparently it is a law that immediately after you own your new home, something must break. Destroy things:

-1photo-12

Then call a carpenter.

I have a bunch of recipes saved up that I need to work my way through, so first up it's Algerian kesra bread. Also called aghroum, and a cousin to Moroccan harsha bread, this is a staple of the Algerian diet and probably one of the things I will miss most from Algiers. It's a very simple bread, but it takes a bit of technique and practice to get it right.

DSC_0014DSC_0016
DSC_0017DSC_0020
The concept is basically like making biscuits or a pie crust, it's a very flaky bread, and you don't want to overwork the dough and make it rubbery. (Speaking from experience, rubbery kesra is the worst.) If you've never worked with semolina doughs before, they absorb liquids and develop gluten very differently than white flour doughs, so that may take a bit of getting used to if you're new to working with semolina. The semolina flour needs to rest a bit in order to absorb liquid, which it does quite slowly, but semolina doughs also develop gluten more slowly, which makes it slightly harder to over-work the dough, to your advantage. You'll probably have to seek out a good Middle Eastern or Mediterranean grocery for the two types of semolina.

DSC_0015

Algerian Kesra Bread
You can see an example of fine and medium grain semolina in the photo above. Recipe adapted from interrogating many Algerians about kesra, lots of practice, and Heni over at the Teal Tadjine.

1 1/2 cups fine-grain semolina
1 1/4 cups medium-grain semolina
1 1/2 teaspoons salt
1/2 teaspoon sugar
1/2 teaspoon baking powder
1/4 cup olive oil
2 tablespoons butter
1 1/4 cups water plus 3-6 tablespoons more as needed

1. Melt the butter in the olive oil and set aside and let cool slightly. In a bowl combine the semolinas, salt, sugar and baking powder. Rub the butter/olive oil mix into the semolina mixture until it forms crumbles. Add in the 1 1/4 cups water and gently mix to form a dough. If still crumbly add more water until it comes together. Do not overmix.
2. Let the dough rest 10-15 minutes to absorb the water. (you can wrap the dough in plastic wrap and let it rest as long as 1-2 hours also.)
3. Rub a small amount of oil in a cast iron pot or flat griddle and heat over medium heat.
4. Divide your dough into three balls. On a stone surface (marble or granite countertops work nicely) pat one ball round out into a round about 1/2 an inch thick. Prick the dough all over on one side with a fork to prevent puffing.
4. Slide the dough into the preheated pan. Let the dough cook for 3-4 minutes on the first side. You may want to rotate the dough and take a peek at the bottom to make sure it doesn't burn. Using a spatula, carefully flip the dough onto the other side (alternately you can flip the dough onto a plate, then back into the skillet). Let cook another 2-4 minutes on the second side. While the dough is cooking, pat out the next round of dough. The dough should be golden and have some deep brown spots on it, but should not be burned. Repeat with remaining dough rounds. Let cool before eating.

DSC_0021