28 December 2012

Pumpkin and Chickpea Salad with Tahini

DSC_0013

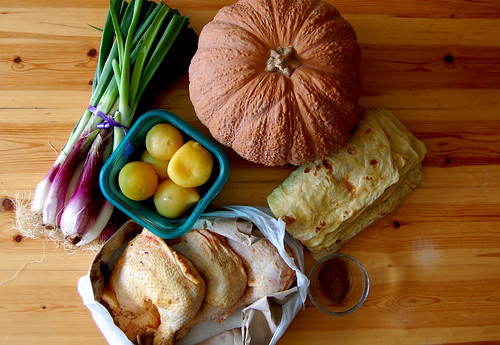
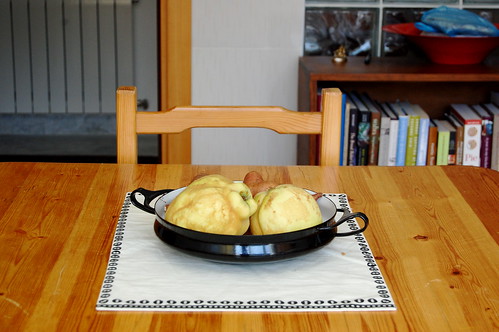
This is one of those recipes that I make all the time and somehow manage to never put on the blog. However, recently several people have asked me for the recipe, and since I was already cooking with pumpkin and chickpeas recently, I can finally share it here.

DSC_0009

This originally came from the second Moro Cookbook, (where we just had lunch last week) but I've been making it so long that it's transformed into it's own sort of thing. Sometimes I make it with only tahini sauce, whereas other times I layer the dish with both tahini sauce and yogurt. Other time I change up the vegetables, making this with fried eggplant rounds or sauteed spinach. Someone commented to me recently that the eggplant version  reminded them of fetteh with eggplant, only lighter and not so glopped with yogurt (don't get me wrong, I love fetteh, but sometimes something more elegant is in order). This is a really great thing to feed a crowd and looks beautiful on a buffet table or as part of a dinner party.

DSC_0010

Pumpkin and Chickpea Salad with Tahini
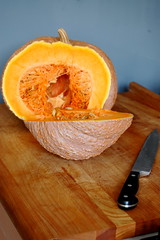
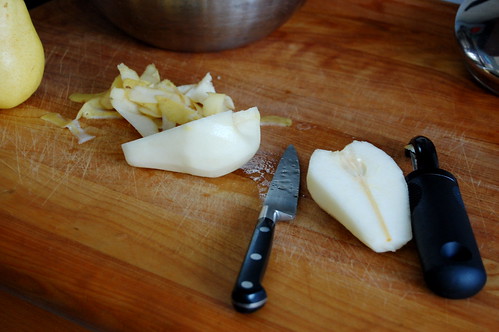
Pumpkin can sometimes be watery, and if you think that may be the case with yours, I like to deep fry instead of roast the pumpkin. The measurements given are just a rough guideline, you can make as much or as little as you want. See below for several variations on this salad.

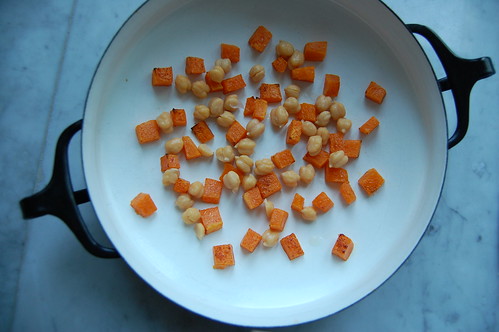
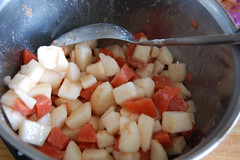
2 cups cooked chickpeas
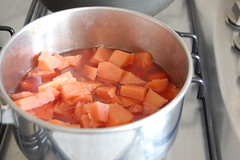
2 cups of 1/2-inch cubed pumpkin
1/2 teaspoon cinnamon
1/4 teaspoon nutmeg
salt to taste
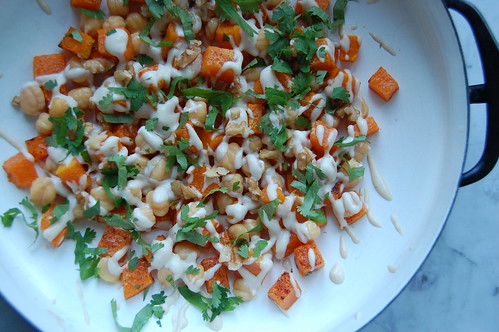
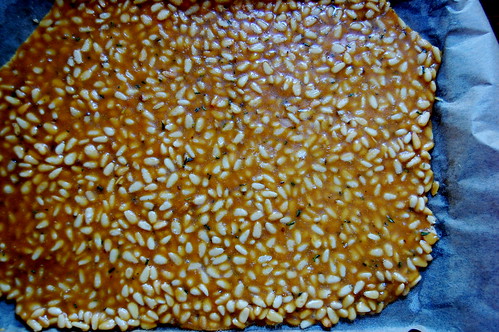
2 tablespoons pine nuts, toasted
chopped cilantro and parsley for serving
1 small container plain yogurt (optional)
For tahini sauce:
1/2 cup tahini
2 tablespoons lemon juice
pinch salt

1.  Mix the tahini, lemon, and salt in a bowl. The mixture should get very thick. Slowly add water to the mixture until it reaches a pourable consistency again. (If you accidentally add too much water, pop it in the fridge and it will thicken up again.)
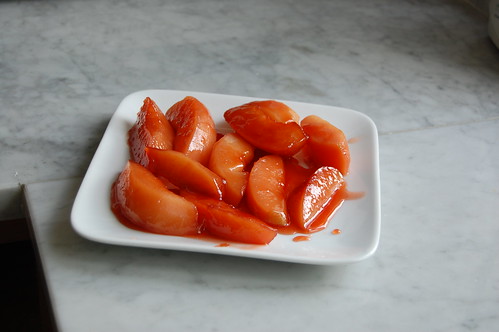
2. Preheat the oven 400 F. Toss the cubed pumpkin with olive oil to coat, and cinnamon, nutmeg, and salt. Spread the pumpkin out onto a baking sheet and roast until just tender. About 15-20 minutes with a regular oven and less if using convection. The pumpkin should be just tender when poked with a knife.
3. While the pumpkin is cooking, place the chickpeas in a saucepan with a pinch of salt and place them over medium heat, just to warm them up a bit.
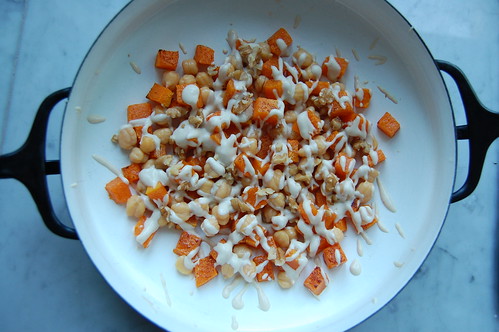
4. Artfully arrange the chickpeas and pumpkin in a serving dish. If I am making a particularly large quantity of this dish, I will drizzle a layer of tahini sauce and yogurt over the dish when I'm about half way through, then pile on the remaining pumpkin and chickpea.
5. Using a spoon, drizzle the tahini sauce generously over the dish, then drizzle some of the yogurt over if using. Top with the pine nuts and sprinkle with herbs. Serve warm or at room temperature.

Eggplant and Chickpea Salad: Substitute sliced eggplant rounds for pumpkin. Salt the eggplant rounds, let sit twenty minutes, pat eggplant dry then fry the rounds in a large saucepan in an inch of oil until browned and tender. Drain on paper towels. Sprinkle the eggplant with Aleppo pepper then proceed with the recipe as usual. You'll definitely want the yogurt here.

Try another variation with roasted cauliflower. Or make it with sauteed spinach. If you want to dress this up, try adding pomegranate seeds or dried fruit (currants, golden raisins).

25 December 2012

Merry Christmas!

From our kitchen to yours!

DSC_0016

21 December 2012

Quince Thumbprint Cookies


DSC_0014

Before we dash off for the holidays, I wanted to leave you with one last holiday cookie recipe. It's a bit of an unusual one, these quince thumbprint cookies, but that amount of cornstarch is not a typo. It makes the cookies extra soft and tender.I haven't quite sorted out a recipe for quince jam yet, but basically you poach quinces in wine and sugar (like in this recipe), and just cook them until the quince completely falls apart and becomes jam like.The ruby red jams makes for beautiful cookies.

DSC_0010

Quince Thumbprint Cookies
Adapted from The Last Course by Claudia Fleming.

1 1/2 cups (3 sticks, 12 oz) butter, at room temperature
3/4 cup confectioners sugar, plus more for dusting
1 teaspoon vanilla
2 cups all-purpose flour
1 cup cornstarch
pinch salt
1 cup finely ground toasted hazlenuts (walnuts also work)
1 cup quince jam (perhaps from a failed quince poaching experiment, or purchased)

1. Cream the butter and sugar until light and fluffy.  Add in the vanilla. Sift the flour, salt, and cornstarch into the butter mixture. Fold in the walnuts. Cover the dough and chill for at least 4 hours.
2. Preheat the oven to 325 F. Form heaping teaspoonfuls of cookie dough balls and spacing them evenly on a greased or lined cookie sheet. Press an indent with your thumb into each cookie. Bake 13-15 minutes, until very lightly golden.
3. Transfer to a rack, then immediately scoop the jam into the indents of the still-warm cookies. Let cool completely, dust with powdered sugar.

14 December 2012

Rosemary Pine Nut Brittle

DSC_0001

I really don't like making brittle. It's true, there's just something fussy and sticky about. I am not intimidated by the use of a candy thermometer, rather it's brittle's tendency to stick aggressively to your teeth, to be impossibly hard or too sticky soft, to carry the burned reminiscence of sugar gone wrong.

DSC_0003

But what if I told you there was a brittle that avoided all of these things? One that turned out perfectly sweet and salty and crunchy, one that you didn't even need to use a thermometer for? For years I thought this was impossible, but in baking for the holidays last year, I was lucky to find just such a recipe. I had the idea to make a Mediterranean-themed cookie box, and pine nuts fit the bill perfectly, along with pistachio shortbread, quince thumbprints, and of course apricot ma'amoul. This recipe comes together super quickly, and only requires your concentration to watch the sugar. And of course, you can still use a thermometer if you like.

DSC_0015

Rosemary Pine Nut Brittle
I do not recommend packing these in a cookie tin with other cookies, the relative humidity will cause the brittle to soften. But who am I kidding, this stuff's not lasting that long anyway. Adapted from Food52.

2 cups sugar 
2 1/2 cups pine nuts 
8 tablespoons (4 oz) unsalted butter 
1 tablespoon finely chopped fresh rosemary 
1 tablespoon finely ground sea salt

1. Line a baking sheet with parchment paper, and have all your ingredients at the ready, mise-en-place style.
2. Place the sugar in a medium heavy-bottomed saucepan and heat over medium-high heat until the sugar melts, stirring occaisionally with a wooden spoon. Once the sugar has melted, stop stirring and watch the mixture carefully as the sugar turns a medium caramel color. You can swirl the pan a bit to even out the texture, and keep a very close eye to avoid burning the mixture.
3. Once you've reached medium caramel color, add in the pine nuts and butter and stir for two minutes. Stir in all the rosemary and half the sea salt.
4. Immediately spread out onto your sheet pan, spreading the mixture evenly. Sprinkle with the remaining sea salt. Allow to cool at least one hour.
5. Break brittle into pieces and store in an airtight tin.

08 December 2012

Charchoura

(Algerian Pumpkin, Chickpea, and Chicken Stew Served over Bread)

DSC_0005

First of all, just to confuse you, this dish is sometimes also called shakshouka (I know, I don't understand how poached eggs in tomato sauce and chicken stew served over bread can have the same name either). However, we're going to stick with the more unique name of charchoura. I was served a version of this recently and I loved it for many reasons, it gave me a new use for our favorite messemen bread, not to mention a good use of now-in-season pumpkin, and overall it was something uniquely Algerian and new to me.

Charchoura is an Algerian Kabyle dish, and it consists in its most basic form of a stew served over torn up flat bread. Traditionally the stew will involve meat or chicken, stewed in a tomato base with chickpeas and seasonal vegetables. Spices and harissa go into the broth, and for a bit of extra kick you can add preserved lemons or hard boiled eggs.

Charchoura is also traditionally associated with the Algerian town of Biskra (bet you didn't know Bela Bartok performed research there), so you'll often find recipes for charchoura biskria. I found this great video of a woman making charchoura with what looks like eggplant and lamb. Most recipes for charchoura call for making the messemen bread yourself, but luckily I buy mine at the market here. The preserved lemon really makes this dish, so be sure not to skip it.

                DSC_0011 DSC_0008

Charchoura (Algerian Pumpkin, Chickpea, and Chicken Stew Served over Bread)
Some versions of this call for adding one cup of tomato sauce along with the water for a slightly thicker broth. I bought a whole pumpkin, chopped some and then roasted the rest to make pumpkin puree, which I've stashed in the freezer.

1 tablespoon butter or ghee (smen)
4 chicken legs, skin-on, drumsticks and thighs separated, trimmed of excess fat
1/2 a red onion, diced
2 tablespoons tomato paste
spices
1/2 teaspoon harissa or other spicy pepper paste
3 cups of cubed pumpkin
2 cups of cooked chickpeas
1 preserved lemon, inside and seeds discarded, diced*
cilantro, for serving
messemen bread (or substitute Lebanese markouk bread or another very thin flat bread)

1. Sprinkle chicken all over with salt. In a large dutch oven, melt the butter over medium-high heat. Working in batches, add the chicken and sear until browned on both sides. Remove the chicken to a plate.
2. If there is a lot of excess fat in the pan, drain off all but 1 tablespoon of it. Saute the onion in the pan until softened, then add the tomato paste, harissa, and spices and let them toast for a minute. Pour about three cups of water into the pan, then add all the chicken and any accumulated juices back into the pan. Add enough water so that the chicken is just covered and a pinch of salt. Place a lid on the pan and let simmer on low heat for 40 minutes.
3. While you're waiting, tear up the bread into very thin bits.
4. Add the chickpeas, pumpkin, and preserved lemon to the pot, cover and let simmer until the pumpkin is tender. Pumpkin cooks surprisingly quickly, so it may only take 5-10 minutes, test a piece with a knife. Turn off the heat on the stew when the pumpkin is done.
5. When ready to serve, arrange the torn bread on the bottom of each plate. Laddle the stew over the bread. Top with cilantro.

* See this page for a quick version of preserved lemons.

04 December 2012

Brown Sugar Cookies

DSC_0134

Did you know that this blog turned 6 years old this week? Six years! I can't believe I even have a blog, much less have had one for so long, not to mention the fact that sometimes I think about how young I was when I started this thing and shudder. (Kids! beware the internets, lest one of your coworkers come into work one day and tell you that their wife found your blog and read the deep thoughts of your early twenties!)

This blog has certainly changed over the years, after all I no longer have time to spend an entire month making different kinds of homemade ice creams. I decided long ago that I wouldn't feel bad for not always posting regularly here, that this wasn't my job or an obligation. But the truth is, I'm often happier when I'm posting here, when I'm cooking and taking pictures and nerding-out by scouring Algerian cooking sites for all the different versions of shakshouka or couscous. It means that I've carved out a little time each day to do things that I love, read poems, chop vegetables, listen to podcasts, taste new things, see things through a different lens.

I've thought a lot recently about the fact that some of the posts on here are difficult or awkward to read. Someone asked me for my biscuit recipe the other day and I pulled it up to find, with some amount of horror, that it was a post about sitting in the chemo room with my mom. It feels awkward to refer someone to a simple recipe while throwing them an emotional hit-and-run. But then I thought about my mom's iPhone, and how she had bookmarked the page where I talked about her first diagnosis, and how she would bring it up while waiting in doctor's office's specifically to read all the wonderful supportive comments YOU, dear readers, left for me and for her. I never thanked you for that.

So, ultimately, this blog isn't just about recipes but about the journeys we all take through the lens of the kitchen. Which means that sometimes a post about bread or about veal is really about something much more. In fact some of my favorite posts on here barely contain recipes at all (like this and this). But since we're celebrating our anniversary together, I'll leave you with a few of the most popular posts on this blog, along with a cookie recipe for the holidays.

Most Popular:
Hummus, Cupcakes, Umm Ali, Pink Grapefruit Marmalade, Duck with Apples

DSC_0136

Brown Sugar Cookies
This is a simple sugar cookie recipe tweaked with the use of brown sugar and spices. Much like my favorite molasses-ginger cookie, it's great for this time of year. I think these cookies are best when underdone and soft. They are great for ice cream sandwiches which, in my opinion, is one of the best cookie distinctions there is.

12 tablespoons (6 ounces) unsalted butter, at room temperature
1 1/4 cups dark brown sugar
1 egg
1 teaspoon vanilla
2 cups flour
2 teaspoons baking soda
1/2 teaspoon kosher salt
1/4 teaspoon nutmeg
1/2 teaspoon cinnamon

1. Preheat oven to 350 F (180 C). Mix the flour, baking soda, salt, and spices in a small bowl.
2. Cream together the butter and sugar until light and fluffy. Beat in the egg and vanilla. Slowly add in the flour mixture to the wet mixture, stirring to combine.
3. Trop teaspoonfuls of the dough into greased or lined baking sheets about 2 inches apart. Bake until tops are just set and insides are still moist, about 8-9 minutes. Let cool on a rack.

30 November 2012

Thanksgiving à la Aix

DSC_0160

I had not been out of Algiers since early August, and it was so good to walk around in crunchy fall leaves, to see the Christmas markets in Aix-en-Provence, do some shopping and drink wine in cafes. We cooked Thanksgiving dinner in the cutest rental house (centerpiece: a turkey thigh rolled and stuffed with apples, prosciutto, herbs, and rye breadcrumbs) walked a lot, and ventured out into the countryside. We brought home some delicious cheese, lots of mushrooms (a scarcity in Algiers), and some local wine.

DSC_0177
DSC_0185
DSC_0150

Recommended in Aix:

Mitch
Contemporary cuisine in an elegant small restaurant, the fixed price menus are a good deal, and the service is lovely (they don't mind if dining partners order different numbers of courses, which is refreshing). 

Le Zinc de Hugo
In case you didn't get the memo with the guy butchering big hunks of meat and cooking them in the stone fireplace, this place is a meat restaurant. Despite the fact that it's a very casual rustic kind of place, they have an extensive wine list and a great sommelier.

Yogi
Coming form North Africa, we're always looking for a different flavor profile, like Japanse or Mexican food. This place hits the spot.

La Mado
Good atmosphere with generous salads and lots of seafood.  Nice for a leisurely lunch.

Ze Bis
Classic French home-cooking. They serve everything out of big cocottes and you can serve yourself as much or as little as you want. They had a fantastic pâté de la maison served with pickled girolle mushrooms that I'm dreaming about recreating. I imagine this might be a bit touristy in the summer, but in the winter it was full of locals.

Bechard's
No list would be complete without this classic patisserie. Paul recommends the Tropezienne and I recommend the caramelized apple tart.

Places we did not get to but were recommended:
Le Formal
Lavault

23 November 2012

Shakshouka

DSC_0125

(I know, you're all busy trying to eat those Thanksgiving leftovers, but while we're on vacation I wanted to leave you with a brunch idea, maybe something to make for your family on a quiet holiday morning.)

Shakshouka is probably the most famous North African dish, made popular by North African Jews who took the dish on their diaspora to Israel and elsewhere. But shakshouka is still made across Morocco, Algeria, and Tunisia, with many regional variations. In Algeria, the pepper-tomato mixture alone is sometimes referred to as shakshouka, though it is more likely to be called felfel. Basically, you make felfel, you crack some eggs straight into the mixture and let them poach, and voila. No matter the variation, the poached egg is the signature component of shakshouka.

It has taken me a long time, but I have to say I am more and more into the Middle Eastern thing of eating salty/briney/spicy foods for breakfast. Pickles, feta cheese, olives, poached eggs in spicy yogurt sauce (cilbir), I enjoy all of them. There's something really great about a runny egg yolk and a spicy warm tomato mixture, with some good bread to soak up the sauce.

DSC_0121DSC_0129

Shakshouka (Poached Eggs in a Spicy Tomato-Pepper Sauce)
I usually roast and peel the peppers when I buy them, then keep them in the fridge to toss into dishes whenever I need them. If you don't have harissa then Aleppo pepper or red pepper flakes will work. Serve with Algerian kesra bread.

2 gloves garlic, minced
3 large or 4 medium sized tomatoes, chopped
4 long green peppers, roasted per below
1/4 teaspoon harissa, or to taste
4 eggs
chopped cilantro and parsley for serving

To make shakshouka:
1.  Heat some olive oil in a wide pan. Add the garlic and let saute until aromatic, do not let the garlic brown. Add in the tomatoes and season with salt. Let the tomatoes simmer until thick and saucy, about 15 minutes. Add in the chopped roasted peppers, the harissa, and simmer another 5-10 minutes to combine.
2. Crack each egg directly into the pan, spacing them evenly. If you are using a very shallow pan the eggs may poach quickly on their own, however if your pan is a bit deeper I find the eggs poach more quickly and evenly if you cover the pan with a lid. Poach until the whites are set but the yolks are still runny. Remove the pan from the heat and sprinkle with cilantro/parsley.
3. Serve by scooping the eggs and tomato-pepper mixture into bowls. Serve with good bread. Some yogurt on the side is also nice.

To roast peppers:
1. Preheat the oven's broiler and set the oven temperature to 500 F. Rub a baking sheet with olive oil. Halve the peppers and set the cut side down on the baking sheet, rubbing their tops with a bit of olive oil. Broil until the pepper's skin is blackened and bubbly in spots - this could take anywhere from 15-25 minutes depending on your oven, so just keep an eye on them and be sure not to burn them.
2. Immediately place the peppers in a bowl and cover with plastic wrap - this allows the peppers to steam and their skins to loosen. When the peppers are cool carefully peel off the blackened skin. You don't have to be perfect about it. Slice the peppers lengthwise and cut them crosswise into rectangular pieces. Set aside.

17 November 2012

Shaved Brussel Sprout Salad with Pecans & Thanksgiving Ideas

DSC_0029

It's November and it finally, finally feels like fall here. It's officially cool enough for sweaters, and for the past week and a half it has poured, poured, poured rain, the kind of chilly cold rain that makes you want to stay inside and wear fuzzy socks and stir a big pot of beef-prune tagine all afternoon long. (And yes, that's exactly what I did.)

Thanksgiving is this coming week, and admittedly I have done no planning. We'll be staying in a house in Provence and we plan to go to the markets on Thursday morning and just play it by ear. In thinking about what to serve, I realized that there's only one single lonely brussel sprout recipe on this whole site. I usually like to pan-roast brussel sprouts, and for Thanksgiving we often had a roasted then baked in cream brussel sprout dish. However, I first made this shaved brussel sprout recipe last year and it's really stuck with me.

First things first - shaving brussel sprouts on a mandoline is a huge pain. But you get a great delicate fluffy texture that totally transforms the sprouts into something new. I first had a dish like this in Portland, Maine, and I have to say even someone who really likes brussel sprouts was surprised they could taste so good raw. The rest of the salad is easy, some toasted pecans, a hint of cheese, and a simple dressing, and you're all done. For Thanksgiving, where so many dishes are so heavy, I like that this fall vegetable dish is light but still full of flavor.

More Thanksgiving ideas from the archives:
Roast Turkey with Pomegranate Gravy
Tamarind-Glazed Pearl Onions
Roast Cauliflower with Tahini, Almonds, and Pomegranate
Bulgur Pomegranate Walnut Salad
Potato Kibbe
Flaky Sesame Rolls
Lida Lee's Cornbread Dressing

Pecan Pie
Quince-Pear Pie
Pumpkin Pie
Chess Pie
Apple-Cranberry Crumble Pie

DSC_0031

Shaved Brussel Sprout Salad with Pecans
This is one of those recipes that don't really need specific amounts- you can make as much or as little as you want as long as you keep things in proportion. If you want to make this ahead of time, combine the shaved sprouts, pecans, and cheese up to one day ahead. Then dress the salad before you want to serve it.  

3/4 lb brussel sprouts
1/2 cup pecans, broken into small pieces and toasted in a pan with a bit of butter
3 tablespoons finely grated Pecorino Romano cheese
1/4 cup olive oil
juice of 1/2 a lemon
1/2 teaspoon mustard
salt, pepper to taste

1. Whisk together olive oil, lemon, and mustard and set aside.
2. Using a madoline or slicer, shave the brussel sprouts. Hold each sprout by its stem end and shave, being very careful of your fingers. Discard the stem ends of the sprouts.
3. Transfer shaved brussel sprouts to a bowl and stir in the pecans and cheese. Add the dressing to coat- you may or may not need all the dressing, use your judgement. Season well with salt and grind some pepper over. I find this salad is best served about 30 minutes after it has been dressed. 

12 November 2012

Monday Link Action

Tree at the Kampinski Dead Sea

The Mobius Bagel

The State of the Short Story - I am a huge short story fan, often when I'm working a lot I just can't get into a novel, but a short story before bed is perfect.

I've always made my mother's parker house rolls for Thanksgiving, but I'm thinking about mixing it up and making these Georgene's Fluffy Rolls this year. Something about the dipping them in butter is calling to me.

Mona el-Tahawy on women in the Middle East now.

I've been making a lot of soups lately (recently purees of butternut squash-curry or spinach-leek), and this Spiced Lentil Soup with Coconut Milk is on my list to try.

Alex Ross on gay rights.

As soon as I get my hands on some unsulphured blackstrap molasses I plan to make these ginger cookies.

Yotam Ottolenghi's new book is definitely on my Christmas wish list. 

09 November 2012

Paul's Pickled Turnips

DSC_0103

I've always thought of pickling and preserving as one of those things that you get into when you really, really like to cook. There's something about it that only a die-hard cook is willing to do - the long wait until gratification, the hundreds of peaches you have to peel or tomatoes you have to blanch, fiddling with glass jars and boiling water. But of course, preserving is one of those things good cooks have to love, because it's all about capturing ingredients at the peak of their season.

So, I was surprised when Paul, who here-to-for has always ignored my jam-making sessions while happily eating the results, has been on a pickling kick. First we made makdous (pickled eggplants), which thanks to a bit of an equipment malfunction failed miserably. Undeterred, Paul then expressed a desire to make Lebanese pickled turnips, which I had never made before.

You may not recognize them as turnips, since they're bright pink, but if you've ever eaten a spread of mezze, these were probably on there. Found throughout the Levant, the turnips are pickled in a simple vinegar solution, with some beets in the bottom of the jar to turn them bright pink. The pickling couldn't be simpler, combine vinegar and salt, pour over turnips. Ta-da, one week later you have pickles.

Paul added in some slices of hot pepper to give the pickles an extra kick, which worked really nicely. In the future, I would be sure to add some more beet slices (about 3-4 per jar) to make sure the pickles come out really pink. These are great, not only as a tangy side on a mezze table, but added to sandwiches and wraps too.

DSC_0387

Lebanese-Style Pickled Turnips
Cut the turnips while your brine mixture cools, it's important that the brine mixture be cold so that it doesn't cook the turnips. Adapted from David Leibovitz and Aromas of Aleppo.

3 cups water
1/3 cup coarse white salt, such as kosher salt or sea salt
1 bay leaf
1 cup distilled white vinegar
2 pounds (1 kg) turnips, peeled and cut into batons
1 small beet, peeled and sliced
a few slices of a chili pepper with seeds (we used a banana pepper)
equipment: clean glass jars, 16-32 oz works well

1. Heat one cup of water, the salt, and the bay leaf over medium heat, until the salt is dissolved. Let the mixture cool completely. Combine the salt mixture with the remaining two cups water and the vinegar.
2. Place a few beet slices and 1-2 chili slices in the bottom of each jar. Place the turnip batons into the jars. Pour the brine mixture over top to cover. Seal the jars and place in a cool dry place for one week to cure.
3. At this point your pickles are ready to eat. If you plan to store them longer than one week place them in the fridge - leaving them out longer at room temperture will cause your pickles to lose their crunch.

03 November 2012

Quince and Pear Pie

DSC_0092

I saw a recipe for a quince and pear pie the other day and thought it was a brilliant idea. What could be more perfect for fall? However, when I started reading the recipe I was quickly disappointed - the recipe called for making a quince paste, and layering the paste with cubed pears in the pie. I just think the idea of putting a paste in a pie, especially a fruit paste, is rather uninspiring. Spending three hours to make said fruit paste - I was even less inspired. 

DSC_0073DSC_0088

However, I still liked the idea of making a quince and pear pie, and now that I've got my quince poaching technique down, I proceeded without a recipe. Paul - pie maker extraordinaire - made the crust using a combination of butter and shortening (non-hydrogenated of course). The pie came out perfectly, filling the house with the smell of pastry, fruit, and spice. I know everyone is starting to plan their Thanksgiving menus, and this pie might just be on ours.

DSC_0086

Quince and Pear Pie

for the quinces:
2 quinces, peeled, cored, and cubed
1 cup sugar
juice of one lemon
2 cups water or white wine
1 star anise pod
1 cinnamon stick

for the pie:
2 lbs pears, peeled, cored, and cubed
1/2 cup sugar, plus more for sprinkling
1/2 teaspoon ground cinnamon
1/4 teaspoon allspice
2 tablespoons cornstarch
prepared crust for a double crust pie
1 egg, for egg wash

1. Place the sugar, lemon, water or wine, anise, and cinnamon in a pot and bring to a low simmer. Peel, core, and cube the quince and slip the pieces into the simmering water as you work. Cook the quince for about one hour, until rose-colored and tender but still firm. Depending on your quince it may take more or less time. Remove the quince from the pot and let the liquid continue to simmer until it is reduced to a thick syrup. Discard spices and set aside.
2. Preheat oven to 350 F. Roll out your two prepared crusts. Fit the bottom crust into the pie pan and place the pie pan, and the remaining top crust back into the refrigerator. Peel, core, and cube the pears and add them to a large bowl. Stir in the sugar, cornstarch, allspice and cinnamon. Let the mixture sit for anywhere from 5 to 30 minutes. Fold in the quince fruit.
3. Scoop the fruit out with a slotted spoon into the pie crust, leaving behind any juices in the bowl. Drizzle the quince syrup over the fruit (if the syrup has solidified just reheat it until pourable). Cut the second crust into strips and weave them into a lattice pattern on top of the pie. Trim the crust and pinch the edges closed. Beat the egg with a tablespoon of water and then brush over the crust. Sprinkle some sugar over the crust as well.
4. Bake for 45-55 minutes, until the pie juices are bubbling and the crust is golden. Let cool on a rack.

27 October 2012

Poached Quinces


DSC_0076

Quinces look like big gnarly very hard apples. We see them growing on trees in our neighbor's yard, hanging heavily on branches, and for sale in the markets in the last few weeks. In the past, my attempts to cook quinces have always been rather disastrous, perhaps because of poor recipes or user error, or perhaps also because of the poor quality of American quinces. They always turned out mushy and I would just end up pureeing them into a big batch of membrillo (Spanish quince paste).

Paul was out of town a few weeks ago and I went a little quince crazy. Having purchased several of them, I poached and roasted them in a variety of ways. The poached quinces came out perfectly, tender but not mushy, the perfect golden hue, they reminded me of the wonderful quinces we had in Istanbul, though slightly less sweet. Like in Istanbul, we ate them with whipped clotted cream and a sprinkle of pistachios on top. This recipe makes a great baseline for other concoctions - think of sauteed pork chops with quinces, or a quince tart. And in our next post we'll talk about a quince and pear pie (just in time for Thanksgiving!).

DSC_0031


Poached Quinces 
Quinces are very hard, so it's important to be careful and use a very sharp heavy-weight knife to cut them - if you're using a dull knife it could slip and injure you. Adapted from David Lebovitz.  

6 cups water
1 cup sugar
3 tablespoons honey
4 large or 5 medium quinces
the juice of 1 lemon
optional spice additions: 1 vanilla bean, or 2 star anise plus a cinnamon stick
equipment: parchment paper

1. Place water, sugar, honey, lemon juice, and spices in a large pot and bring to a simmer.
2. Meanwhile, peel the quinces,cut them into eights, and cut out the hard center pit of each section. Slip each quince slice into the poaching liquid as you work. This will prevent discoloration of the quinces.
3. Once all the quince are in the pan, cut a round of parchment slightly larger than the top of pot, cut a small hole in the middle of the parchment and place over the just-simmering pot of liquid.
4. The cooking time can vary greatly depending on the size and quality of your quinces - you want them to be rosy colored and tender but not falling apart. It should take at least two hours, mine took about 3 hours. Check on the pan occasionally.
5. When the quinces are done remove them from the pot to a plate, and let any remaining liquid boil down to a light syrup (it will thicken significantly as it cools). Pour the syrup over the quinces and let cool to room temperature. Keep covered in the fridge, keeps 1-2 weeks.

22 October 2012

The Big Eid

DSC_0410

The eid is almost upon us, the usually quiet park next door is slowly filling up with sheep, and every afternoon the neighborhood kids come and gather round to take part in the endless pleasure of poking and prodding at them. The five-year olds in particular seem entranced by the game of child versus sheep, the children trying to topple the sheep by pushing them over, while they stand nonchalantly chewing leaves. As if seven days of torment by young boys were religiously prescribed to preceed their slaughter.

Eid al-Adha is known colloquially as the big eid, like American Thanksgiving, only with four times as much food, and with the ritual animal (sheep rather than turkey) slaughtered on your doorstep. Even the neighborhood feral cats, battered, one-eyed, always perched on top of the piles of garbage to dig up chicken bones, seem to know the holiday is coming up.

We'll be enjoying a quiet holiday of our own over the weekend. We're having a few people over for hummus, muhammara, labne, roast pumpkin salad, and Aleppo-style kebabs. The weather has finally turned cool, just right for jackets and scarves in the morning chill, but sunny and warm at lunch time. This poem came up in my podcasts this week and I liked how it captured the melancholy and beauty of fall:

In Heaven It Is Always Autumn, Elizabeth Spires

Philip Glass Solo Piano Live

DSC_0414

Photos of Algiers' Jardin d'Essai

13 October 2012

Breads of Algeria

DSC_0377

An Algerian told me the other day, "eating a lot of bread is one of the few things we really took from the French." Well, nevermind all those other things the French left behind, but Algerians do really love their bread. Bread here is subsidized, and arrives in the form of baguettes, delivered by truckloads twice a day. I wish I had a picture of this but I am shy about taking my camera out in public. Because of the subsidies, at 5 dinar or .05 euros a loaf, most of the baguettes are spongy and dry not very good. However, you can find some good baguettes scattered throughout the city.

But what we really love here are the local breads, the various flat breads you see piled next to the cashier's stand. Because everyone buys the baguettes, all the local forms of bread are usually sold in small batches, either made by the shop owners themselves or by a small local bread maker. Many Algerians make these breads themselves at home.

There are a couple unique things about these breads, first they are usually made with a semolina dough, either completely semolina or semolina with a little regular flour mixed in, so they require a lot of kneading and a long rise time. Second, several of the breads are made on special pans, such as a clay pan that looks like the bottom of a tagine, but is made of unglazed clay with little spikes all over the bottom (see here). Below are some of the breads we've discovered in our first months in Algiers:

DSC_0375

Kesra Matlua'a

This is probably the most common kind of bread available. Called kesra bread, this version is leavened (matlua'a means risen) and is made on the clay pan described above. You can see the little pin-pricks left from the pan in the photo aboove.The bread is light and spongy, with a heartiness from the semolina. The bread is really only good the day it is made and gets dry quickly.

DSC_0429
DSC_0379

Kesra Rakhsis

Above are pictured two versions of the flat, or unleavened, kind of kesra. It is dense and chewy and slightly sweet. I really like this one for breakfast, alongside my yogurt and honey. This bread supposedly lasts a long time but we always devour it quickly, so we've never found out.

DSC_0078
DSC_0081

Messemen

This is probably my favorite kind of bread here, but as the name implies (messemen means greasy or buttery) it is a bit rich. This is a semolina based dough that is stretched out very very thin and then cooked on a wide flat griddle with butter. It resembles Lebanese markouk bread, but a bit more free form and of course more greasy/buttery to the touch. I especially like to make sandwiches by spreading the bread with labne (strained yogurt) and sprinkling mint and olives over and rolling it up. Labne and sour cherry jam roll-ups are another favorite for breakfast.

DSC_0077

Of course, there are many other kinds of breads - round hearty whole wheat and bran loaves, a bread called pain mahonais, named from Spanish immigrants who came to Algeria from Mahon, Minorca, and flavored with anise seeds and herbs or olives. Special breads for eid or flat pancakes cooked on one side and sprinkled with honey. We look forward to sharing more of the breads here with you as we explore.


06 October 2012

Leek and Spinach Pie

DSC_0404

I wish I had a picture to show you the interior of this beautiful green pie, but I'm afraid we ate it before there was time. Paul is the usual pie-maker in the house, but he's been slacking recently, and I thought I'd give our pie pans some exercise with a savory pie.

Since we work long hours, the weekends are usually the only days that we hit the markets before the greens are wilted from sitting outside all day. On Friday mornings I always make sure to get some greens, herbs, and lettuce, and then follow my trusty cleaning and storing mechanism to keep them fresh for the week. The spinach here is sold in big shaggy-leafed bunches, and it was looking particularly vibrant the other day so I picked up some along with leeks, and some other newly-arrived fall produce.

I thought a spinach and leek pie would be a great convenient thing to take for lunch during the week. This is sort of the American version of spanikopita, vegetables with just enough cheese and buttery crust to keep them from being too virtuous. The cornmeal crust came out fantastically, and I'll definitely be using it again in the future. In fact, this whole pie is going on the 'save and repeat' list.

Leek and Spinach Pie with Cornmeal Crust
If your cornmeal is a bit coarse, as mine was, just grind it in a coffee or spice grinder until fine. In place of the yogurt in the filling you can always use creme fraiche. Adapted from food52.

crust:
1 1/2 cups flour
1/2 cup fine-ground yellow cornmeal
1/2 teaspoon salt
10 tablespoons (150 grams) butter, cold and cut into small pieces
5-7 tablespoons ice water

1. Mix the flour, cornmeal, and salt in a bowl. Add in the cubes of butter, and work the butter into the flour mixture with a pastry blender or 2 forks. Work until the mixture has lumps the size of small peas. Using a fork, slowly pour the ice water into the butter/flour mixture until a dough just forms. Be careful not to add too much water. Gather the dough into a ball and refrigerate (this can be done a few days ahead of time).
2. Pull the dough out of the fridge and let warm up for 2-5 minutes. Divide the dough in half, and on a floured surface, roll out half the dough and fit it into a pie pan. Roll out the other dough half into a large round. Chill the pie pan and the round of dough while you make the filling.

filling:
2 large bunches spinach, cleaned and torn into bite-size pieces
1 clove garlic, minced
4-5 leeks, cleaned, halved, white and light green parts sliced
1/2 cup grated cheese (something like Gruyere, Cantal, Emmentaler)
1/3 cup plain yogurt
2 eggs
olive oil
salt and pepper
prepared cornmeal crust

1. Preheat oven to 350 F (180C).
2. Heat some olive oil in a wide pan, and add the leeks and saute until golden and soft, about 15 minutes. Add the garlic, spinach, and salt and pepper, and saute until the spinach is dark green and any liquid is cooked off. You may have to add the spinach in a couple batches as it wilts. Transfer greens to a bowl and allow to cool slightly.
3. Mix the cheese, eggs, and yogurt into the greens and season again with salt and pepper.
4. Place the filling into your prepared crust. Fit the top pie crust on top, trim and crimp the edges,and slice 4 slits into the top crust. Bake 45-55 minutes, until golden brown. Let cool at least 20 minutes before serving.

29 September 2012

Strawberry Almond Cake

DSC_0390

As most people know, many Americans in North Africa have faced terrible protests this month. In Algeria, we are very lucky, as a strong police presence and general desire for calm in the city have kept things quiet here. In fact, the only recent protest was a large protest against the management of the ruling FLN party. So, on one of these recent tense days, I'm at the fruit and vegetable stand and my bill is about twice what it usually is (all, you know, 5 euros). But before I could wonder if I was paying the new foreigner tax, the vendor, who is always very kind to me, explained that the strawberries in my basket were imported from Spain, and thus very expensive.

With my treasured out-of season strawberries at home, we snacked on a few, but I knew I had to use them up quickly before they went bad. I remembered a blueberry cake recipe I'd seen online, and thought I could tweak it to go with strawberries. The result is a really tender wonderfully scented cake. The addition of almond and amaranth flours makes for a soft moist crumb, and the almonds and sugar on top add crunch to the strawberries.

** Update: We recently made this with chopped pears (I sauteed the pears in a hot pan to soften them and draw out some of their moisture first) and it came out great.

DSC_0385

Strawberry Almond Cake

1 cup flour
1/4 cup almond meal (ground almonds)
3 tablespoons amaranth flour
1 teaspoon baking powder
1 pinch salt
8 tablespoons butter, room temperature
1 cup sugar
2 eggs
1 dash vanilla extract
1/3 cup milk
1 1/2 cups chopped strawberries
1 handful (about 1/3 cup) slivered almonds
1 tablespoon sugar, for sprinkling on top

1. Preheat the oven to 350 F. Grease an 8 inch square baking pan.
2. Mix the flours, almond meal, baking powder, and salt in a bowl. In a large bowl, cream the butter and sugar until pale and fluffy. Beat in the eggs one at a time, until the mixture is ribbony, then add in the vanilla. Fold in half of the flour mixture, then add in the milk, then fold in the remaining flour mixture until combined. Fold in half of the strawberries.
3. Pour the mixture into the prepared pan. Arrange the remaining strawberries on top. Scatter the almonds and the 1 tablespoon sugar over the top. Bake 40-45 minutes, until puffed and lightly golden. Let cool on a rack. Serve with whipped cream.

22 September 2012

Provencal-style Veal Shortribs


DSC_0350

I usually like to test recipes twice before they make it onto this site, though only once if I think something was truly fantastic the first time. So, a bit unusually, I am posting this recipe despite the fact that it didn't come out as perfectly as I liked in our kitchen. You see, there is a nice very big grocery store in Algiers that's all the way out by the airport. Because it's so far away we only go out there about once a month, which means I can go a little crazy when we're there. Loaves of brioche! And my favorite flat bread! A whole salmon! A properly cleaned chicken! Veal shortribs! Frozen brussel sprouts! No kidding I bought all of these items and more last time I was there.

So, excited about my veal shortribs, I was searching around for something to make with them. (After grilling the whole salmon of course.) The recipe I came up with was sort of an amalgam of several different recipes for provencal-style shortribs, since provencal ingredients are easily found here. I also liked that the recipe called specifically for veal shortribs, not just generic beef.

First of all, this dish smeels amazing when you cook it, I'd almost say that's reason enough to make it. The aromatics of orange peels, wine, and herbes de provence simmer for hours, filling the house with a delicious smell. Overall, the meat, tomatoes, olives, and herbs make for a wonderful dish. My only qualm about this was that our shortribs themselves, despite stewing for over 3 hours, just were not as melting tender as I wanted them to be. However, I am almost positive that any failings in our meat were due to the meat itself, as buying halal veal shortribs in Algeria is a bit of a stretch to begin with. So I urge you to try this recipe on your own, serve it over egg noodles, and hope your meat is as meltingly tender as can be.

DSC_0349

Provencal-style Veal Shortribs
The olives don't have to be pitted, it's a rustic dish so just put a plate on the table for the pits. If you want to go all out you can try using fresh herbs (marjoram, rosemary, thyme, lavendar) in place of the dried.


3 pounds veal (or beef) short ribs
1 1/2 cup beef or chicken stock
1 cup white wine
3 cloves garlic, peeled
1 medium onion, peeled and sliced
2 carrots, chopped  1 tablespoon olive oil
3-4 long strips of orange peel
1 tablespoon dried herbes de provence
3 flat anchovy filets, chopped up
1 bay leaf
1 handful oil cured olives (we used green, but black are preferred)
3 cups chopped tomatoes
ground white pepper, to taste
  1. In your casserole over medium high heat add the olive oil to coat the bottom.Brown the veal ribs on all sides, then remove to a plate.
  2. Add the anchovies and give a quick stir. Add the white wine and let it deglaze the pan. Add the tomatoes, the bay leaf, the olives, orange peel and herbs. Season with salt and pepper. Add the veal back in and the stock, stirring to mix. Cover and bring to a simmer. A simmer is not a slow boil; it’s really just some bubbles that find their way to the surface. With the cover slightly ajar cook in this way for about three hours or until the meat is meltingly tender.
  3. Remove the bay leaf and serve over noodles, rice, mashed potatoes, etc.


09 September 2012

Swedish Cinnamon Cardamom Buns: A Photo Essay

Still no home internet - we're going on month two now, so we're borrowing a friend's internet to do a little emailing, uploading, and downloading. Unfortunately that means not much time to write here - so I'll leave you with a recipe inspired by our recent trip to Stockholm.

DSC_0331
DSC_0320
DSC_0322
DSC_0323
DSC_0325
DSC_0327

Swedish Cinnamon Cardamom Buns

1 1/4 cups milk
1/2 tsp ground cardamom
50 g fresh yeast or 1 package yeast
2/3 cup sugar
pinch salt
150 grams butter (5.2 ounces, 10 tablespoons), room temperature
1 egg
5 cups flour
filling: 200 grams (7 ounces) butter, scant 1/2 cup sugar, 1/4 tbl cardamom, 3/4 tbl cinnamon
1 egg for brushing over dough

1. The dough: Mix the cardamom with milk and heat until scalding. Let cool to just warm. Crumble the yeast into a bowl and pour the milk over and stir until the yeast bubbles. Mix in sugar, salt, butter and eggs. Add a little flour at a time and work until you have a smooth dough. Let rise about 50 minutes under a kitchen towel.
2. Filling: Mix butter, sugar, cardamom and cinnamon.
3. Divide the dough in half and roll out half at a time to a rectangular shape. Spread half of the dough with half the butter cream (it will be thick). Fold the long sides together and cut into 4 cm wide long rectangles. Make a lengthwise slice up the rectangle, but don't cut all the way through the top end (basically you have two "legs" connected at the top.
Spin the "legs" in opposite directions until they're very twisty. Tie the legs into a knot, as prettily as you can manage. Hide the ends under the bun.
4. Place the buns on papered sheet and let rise another 40 minutes.
5. Preheat oven to 400 degrees F (200 C). Brush the buns with beaten egg and bake them for about 15-18 minutes until golden brown.