31 January 2008

Pretzel Baguettes

Because the Corner Bakery is conveniently located in the train station where I commute, I occasionally I stop by this local chain to pick up some bread to go with my lunch or dinner. I am particularly fond of their pretzel baguette, basically a soft pretzel in baguette form, in fact I rarely let myself buy them as they are so addictive. They are gorgeous too, smooth, shiny, with characteristic white slash marks across the top. I always thought the pretzel baguette was a quaint quirk made up by a creative baker, but it turns out it really is a real German food, known as laugenstangen.

It also occurred to me that I could make my own pretzel baguettes, thereby creating perfect homemade cradles for sausage and onion sandwiches or merely for slathering with mustard. I found a recipe for pretzel rolls and set to work. Did you know that pretzels get their characteristic shiny exterior from boiling before baking (much like bagels), only that pretzels are boiled in a baking soda bath? I didn’t, but it was fun to boil them in the foamy water and then watch their exteriors turn dark golden and shiny in the oven. Though this is a yeast bread, it has a fairly short rising time, which makes them fast and easy to make.

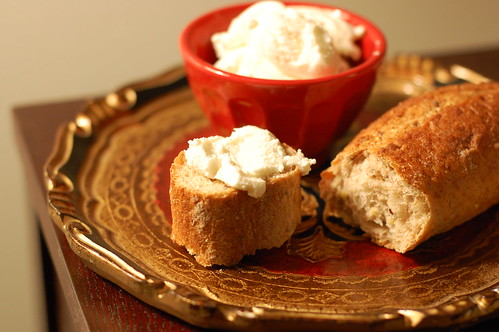
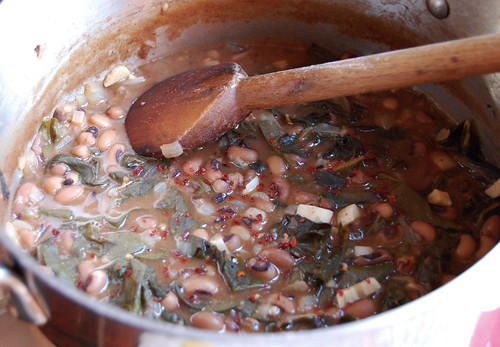
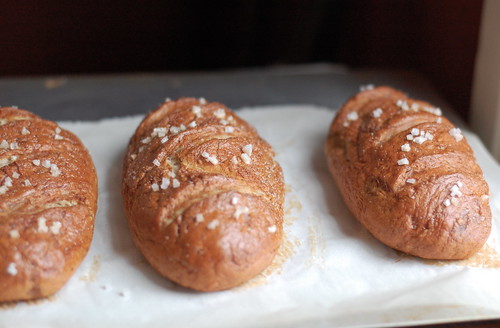
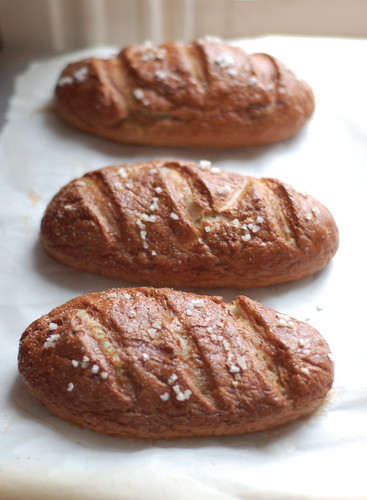
And the results? While my baguettes weren’t as smooth and shiny as the commercially made ones, the taste was just as delicious, with salt-crusted punctuations and soft interiors. I know they seem destined for meat-filled sandwiches or sauerkraut, but we were perfectly happy dipping them in a bowl of soup. I bet they’d make perfect snacks with a glass of good beer, too.

Pretzel Baguettes
These are really just an excuse to eat a soft pretzel with your lunch or dinner, although they are a good one at that. Keep in mind they can be a bit unwieldy to boil, so it’s best to make them mini-baguette size. A few finely crushed caraway seeds are a nice addition to the dough if you feel like it. Makes 4 mini-baguettes.

2 3/4 cups bread flour
2 1/4 teaspoons rapid-rise yeast or SAF instant yeast
1/4 teaspoon salt
1 teaspoon sugar
1 cup hot water
for boiling and baking:
1/4 cup baking soda
2 tablespoons sugar
2 tablespoons coarse sea salt
1 egg white, beaten to blend

1. Place the yeast and sugar in a large bowl. Add the hot water and let sit a few minutes until bubbly. Gradually add the flour with the salt, stirring to form a dough. Knead the dough a minute just so that it is smooth and combined (I knead it in the bowl, but you could knead it on a board if you prefer). Rinse the bowl out and grease it. Place dough in bowl, turn to coat, and cover with plastic wrap. Place in a warm, draft-free place to rise until doubled in volume, about 35 minutes.
2. Lightly flour a work surface. Knock the dough down and divide it into four pieces. Shape each piece into a mini-baguette and cut deep slashes in the top with a sharp knife or razor blade. Cover loosely with a towel and let rise for 20 minutes.
3. Meanwhile, preheat the oven to 375 F. Line a baking sheet with parchment paper. Bring 8 cups of water to boil in a large deep pot. Add the baking soda and sugar to the boiling water (caution it will bubble up!!). Lower the heat slightly so the water is simmering but not boiling violently. Add the mini-baguettes one or two at a time and boil about 30 seconds on each side. Carefully use a slotted spoon to remove them.
4. Arrange boiled mini-baguettes on the baking sheet. Brush with the egg white glaze and sprinkle with salt. Bake until golden brown, about 30 minutes.
5. Best stored at room temperature loosely covered with a towel. Do not place in a plastic bag or they will become soggy.

27 January 2008

Comfort Me with Cookies

I started a new job this week and it’s been all I can do just to get there, get back, and take care of all the moving and new house duties. One morning, I bundled myself in the warmest possible coat and headed out the door at 6:30 am, where the moon sat hovering over the Supreme Court like it was midnight not morning. The train was late, my new ID card didn’t work, and after work by the time I’d done everything in reverse and emerged out of the train station almost twelve hours later it was dark once again. I faltered: I’ll never go to the gym again. I’ll never cook again. I’ll never see the sun again. I wanted to curl up in a big arm chair and cover my head with a blanket.

But slowly, as the week went on, I realized that it’s going to be okay. I had to repeat it to myself a few times like a mantra, but it will be. I actually like my commute, the train is great, it’s just enough time to read a bit of a book, and it’s never crowded. I won’t have to get up that early forever. My job is really cool. There’s a gym in my building and I intend to make good use of it. I love my house and neighborhood. Eastern Market is only a short walk away. I also remembered when I was dancing and going to school in New York, keeping twelve hour days, and even then I always cooked for myself. Did I use canned beans instead of from scratch? Absolutely. Did I also find the time to make my own homemade bread and yogurt? You bet. And in a way, being busy makes cooking all that more special. The past few months I’ve had plenty of time to cook, read, and research to my heart’s desire, and I’ve taken full advantage of it. But now that my time is more limited, carving out that space to make something special, unusual, or just comfortingly homemade is all the more dear to me.

Everything in my life right now is new: new house, new job, new car. New to driving, new clothes, new bed, new bills. Which is why culinarily, I don’t need anything new, I need cookies. Not little dainty cookies either, big fat chock-full American style cookies. Chocolate Chunk Coconut Pecan Cookies. Don’t you feel better? I have to say, this is really one of my favorite chocolate chip cookie recipes- it’s just got so many things going for it, big chocolate chunks, sweet bits of coconut, soft buttery insides. For you nut-haters out there, the nuts are finely chopped so you’ll barely notice them, but they really add something to the cookies, and with all the stuff in there to hold them together, you can make them super-huge size if you’re so inclined (I like mine a bit more modest). Just make sure to use good quality chocolate, last time I used chocolate that was on the bitter edge of bittersweet, and since it’s in big lovely chunks, you can really taste the difference.

I’ll be tucking a few cookies in my bag this week, and I’m sure my commute’s going to be a lot better.

Chocolate Chunk Coconut Pecan (ChoCoPe) Cookies
It's like the NoLiTa of cookies (or is it TriBeCa?)! Eitherway, this variation on chocolate chip cookies is delicious. If coconut isn’t to your taste I imagine you could try substituting oats for the coconut. Makes 16-20 cookies.

2 1/2 cups unbleached all-purpose flour
1 tsp baking soda
1/2 tsp salt
1/2 tsp instant espresso powder
14 tablespoons (7 oz) unsalted butter, at room temperature
3/4 cup granulated sugar
3/4 cup light brown sugar
2 large eggs
2 tsp pure vanilla extract
8 oz good quality chocolate, cut into chunks
3/4 cup flaked coconut, roughly chopped
1 cup pecans, finely chopped

1. Preheat oven to 350 F. Line a baking sheet with parchment paper. In a medium bowl, combine flour, baking soda, salt, and espresso powder.
2. In the bowl of a stand mixer (or in a large mixing bowl), cream together the butter and sugars until the mixture is smooth, fluffy, and pale in color about 5 minutes. Add the eggs one at a time and mix to encorporate, then add the vanilla extract. Gently fold the flour mixture into the batter in two additions. Fold in the chocolate, coconut, and pecans. Chill the dough in the refrigerator for at least 1/2 an hour and up to 4 days.
3. Scoop hunks of dough into fat, 2-inch balls. Place dough 2 inches apart on baking sheets. (Store any extra dough in the refrigerator while the first batch bakes) Bake cookies for 15 to 18 minutes, or until golden brown around the edges and slightly soft in the center. When done, slide the sheet of parchment paper and its cookies onto a countertop, cutting board, or cooling rack. Repeat with the remaining chilled dough.

23 January 2008

Fresh Goat Cheese

Hello there.

I hope you had a nice long weekend. I certainly did. The impending move and new job loomed largely on the horizon, but it was full of lovely things none-the-less. There were adolescent lettuces and Eastern Shore popcorn at a fun birthday dinner, a nerve-wracking overtime game, a new episode of The Wire, and several walks in the bone-chilling, exhilarating cold. I managed to squeeze in a few yoga classes to warm me up, a cup of celeriac-kale soup with tomato dumplings shared with mom, and trolled my way through boxes of old photographs, one of those tasks that's never as productive as it's meant to be, but is a great way to while away an afternoon. What more could you ask of a weekend, really? Oh, and I bought a carton of goat milk. And then I made cheese.

I know, I'm excited just typing it. And it was so easy, too! There was that container of goat milk, slyly beckoning me from the market shelf, and my curious hands just had to buy it. Of course, I had visions of making beautiful little crottins of goat cheeses or perhaps some goat milk yogurt, but in the end I just made the simplest cheese recipe I could find. When I lived in places where ricotta cheese wasn't available, I made my own, and the technique used here is much the same. It's quick, easy, and yields delightful results. But though I've made simple cheese before, this fresh goat cheese was beyond my expectations. It has the soft-curd texture of ricotta but with an underlying flavor- don't expect anything strong or creamy like chevre, only a quiet subtle note that keeps it just this side of bland. On Monday night I mixed it into a beet salad, but the beets almost overwhelmed it, and the cheese was so delicious in its subtlety we ended up setting aside our plates and simply spooning the cheese onto little pieces of bread, carefully tasting and chewing each bite.

The recipe doesn't yield a huge amount, which is okay because it's best enjoyed at its freshest. Besides, it's ready in only half an hour, and then you'll have your own homemade cheese! I can't wait to see what next weekend holds, and I hope it includes more cheese.


Fresh Goat Cheese
This simple cheese is like a goat-milk ricotta, and is best freshly made. Its subtle flavor invites experimentation with flavors and seasonings- you could try infusing the mixture with different herbs and spices. Though this can be made with cow's milk, I think that would be rather beside the point.

1 pint goat milk
1 tablespoon mild vinegar
3 tablespoons lemon juice
1 teaspoon salt

1. Place milk in a medium saucepan, stir in the vinegar, lemon, and salt. Place the mixture over a medium flame and place a thermometer in it.
2. Meanwhile, line a mesh sieve with several layers of cheesecloth (I fold it over so it has about 4 layers). Set the sieve over a bowl.
3. Bring the milk mixture to 175 F (do not let it boil). When the milk reaches 175F (in my case it took until 180), you will see the curds and whey separate. You can give the mixture a gentle stir to encourage it, but avoid over-stirring. When it has separated, pour the warm mixture into the cheesecloth-lined sieve and let drain. Gently lift up the corners of the cheesecloth and tie them up. Do not press on the cheese. Suspend the cheese over a sink or bowl and let drain for fifteen minutes. Gently unmold cheese, transfer to a bowl and store in the refrigerator. Keeps for over a week, but is best in the first couple days.

Whey can be discarded or reserved to use in breadmaking or soups.

17 January 2008

Olive-and-Walnut Stuffed Potato Bites

On Tuesday, after a doctor's appointment, trip to the pharmacy, and an Arabic lesson, I had precisely 1 1/2 hours before I had to go hop a bus to yoga and then scoot myself all the way across town to pick up a piece for my computer and then be home to administer a complex set of medications to our puppy. Of course, I decided this would be the perfect time to make, shape, stuff, and fry potato balls. Behold my brilliance.


I actually made it, literally running out the door with my scarf flying behind me and half the potato balls still sitting on the counter, but as I sat down on the bus I realized I smelled like a giant French fry. It stayed with me all through yoga, too, wafting among the incense like a McDonald's franchise. But by the time I made it back home after a long day and reheated those potato bites and made myself a green salad, it was totally worth it. So worth it.


The recipe is for olive and walnut stuffed potato bites, and is very loosely inspired by a Saudi recipe I found in Maria Khalife's The Middle Eastern Cookbook (a new little book written by the founder of the Arab version of the Food Network). I ended up baking the potato balls because sometimes, especially in January, deep-frying just isn't in the cards. Though I'm sure they'd be amazing fried, I really can't imagine anything better than a warm ball of mashed potato with a bright burst of olive in the middle. I think I'd forgotten how marvelous potatoes are, just the smell of them cooking was intoxicating, and that filling: slightly sweet with raisins, the finely ground walnuts are almost unnoticeable except for the hint of nutty flavor, and finally the big salty olive pop. If I were to do this again I would fry not bake them, a few of them got a bit melty when baked.

These would be perfect appetizers, but they make a great end to a long day, slowly popping one after another into your mouth, savoring each and every bite. I guarantee that no matter how many you make, they'll be gone before you know it. Although, if you find people on the bus wondering what that French fry smell is, don't say I didn't warn you.

Olive-Walnut Stuffed Potato Bites
Makes about 24 potato balls.

2 lbs russet potatoes (about 3 large)
3/4 cup flour
salt and pepper
1/3 cup walnuts
2 tablespoons golden raisins
1 cup green olives (pimento-stuffed ones work nicely), rinsed
1/2 teaspoon sumac or substitute lemon zest
1/2 teaspoon allspice
1 teaspoon fresh oregano, optional

1. Put a large pot of water to boil. Peel the potatoes and roughly chop. Cook the potatoes in bloiling salted water until tender. Drain the potatoes and place in a large bowl. Shake the bowl to allow some of the steam to escape from the potatoes so that they dry out slightly. Using a potato masher, mash the potatoes until very smooth. Sprinkle in the flour and season with salt and pepper. Mash the mixture to form a smooth combined dough. Set aside.
2. Place the walnuts and raisins in a food processor or spice grinder. Pulse the mixture until it forms a coarse meal (some chunks are fine). Add the olives and sumac and spices and pulse just so the olives are chopped and you have a chunky mixture.
3. Working with damp hands, take a golf-ball sized piece of potato, flatten in your palm, fill with a small spoonful of olive mixture, then close up and roll into a ball. Continue forming balls, placing them on a baking sheet, until mixture is used up. Refrigerate potato balls 1/2 hour before frying (if you have the time).
4. To fry: Heat a pot of oil to very hot. Fry balls in batches until golden brown, remove with a slotted spoon and drain on paper towels. Serve hot.
To bake: preheat oven to 450 F. Line a baking sheet with parchment paper and add a generous amount of olive oil to the pan. Roll potato balls around to coat with oil, then space evenly on the baking sheet. Bake in the lower third of the oven for 10-12 minutes, or until the bottoms are golden brown (the balls will flatten slightly). Flip over and bake another 5-10 minutes, so that the second side is browned. Keep an eye on the balls so that they don't melt or brown too much. Let cool at least ten minutes before serving (this helps firm the balls so that they don't fall apart). Can be done ahead and reheated.

12 January 2008

The Onslaught


This isn't supposed to happen. Around the holidays your counter is supposed to be filled with tins of cookies and your refrigerator should abound with roasts and braised cabbage and all sorts of homemade goodies both sweet and savory. And then the holidays pass and we clean the house for New Years and after all that indulgence we settle into a January of salads and asceticism. So could someone please explain to me why, in the second week of January, I am so besotted by produce, our kitchen overflowing??

First, my aunt sent us home laden with a caramel cake and a pie and all sorts of commestibles (sorghum molasses! beans! fruit!), some of which have been relegated to the pantry and the freezer, some of which (ahem, cake) were consumed with alarming alacrity. Second, there is the issue of the crate of ruby red grapefruit my uncle sends every year, don't get me wrong, we love them, but eighteen of them, EIGHTEEN is quite a lot. And then, then, only a few days after the grapefruit arrived, a whole box of pears from our neighbor. Did I mention the leftover soup that's packing our freezer from a soup party we had? I'm drowning in the onslaught.

grapefruit box

The pears have slowly, lackadaisically ripened themselves into possibly the best pears I've ever eaten, but I feel as if I've eaten a gallon of them, sliced alongside my breakfast or in a pear and blue cheese tart. As for the grapefruit: six went to the postman who delivered them, another two into the Christmas salad, a few went to breakfasts, but that still leaves seven grapefruits piled haphazardly on the counter. Since the grapefruits are an annual event I am pretty familiar with just about every grapefruit recipe out there: salads, sorbets, compotes, candied rinds, I even made a grapefruit and Riesling terrine once. But the one thing I usually end up making is pink grapefruit marmalade.


This year, as I padded about the kitchen in the quiet dark, slicing grapefruit peels and blanching them twice to remove any bitterness, adding the fruit and sugar to the pot, I did a couple things differently that made this the best marmalade I have ever produced. First, I added a touch too much water to the pot, which meant I had to set the marmalade to a long slow simmer in order to cook it down. It took over an hour in the end, but that long cooking gently caramelized the grapefruit pieces into sweet translucent slices, with only the slightest hint of bitterness. Second, I scraped in the seeds from a vanilla bean, which not only speckled the pink jam with pleasing black flecks but added to the subtly sweet scent.

When I say that this is the best marmalade I've ever made, I mean it's the best marmalade I've ever eaten or tasted. The kind of jam you want to eat straight out of the jar, standing by the fridge door, almost like spoonable candy, except with a pleasant hint of bitterness. The only problem is that it uses just three of my grapefruits and produces a rather large amount of marmalade- four jars, which doesn't really help me with the onslaught around here. Not that I'm complaining, mind you.


Pink Grapefruit Marmalade with Vanilla

3 large ruby red grapefruits
3 cups water
4 cups sugar
1 vanilla bean, seeds scraped
2 tablespoons rose water or lemon juice

1. Set a large pot of water to boil. Cut off the peel of the grapefruits, working to get good thick slices, but leaving the inner white pith closest to the fruit still attached to the fruit. Cut the peels into strips. Blanch the peels by submersing them in boiling water for about three minutes. Drain in a colander and rinse under running water. Bring a fresh pot of water to a boil and repeat the blanching process again, this removes any bitterness. Drain and rinse again.
2. Place the peels in a large pot. Cut off all the white pith from the remaining fruits then, working over the pot, cut between the grapefruit membranes so that the fruit sections fall into the pot. Squeeze juice from the membranes and discard them. repeat with remaining fruits.
3. Add the water and sugar to the pot and bring to a boil, stirring to combine. Lower the heat to a very low simmer. Simmer until the marmalade is thick and translucent, about one hour. The marmalade may still appear a touch watery- keep in mind it will thicken as it cools.
4. Add the vanilla bean seeds and simmer another five minutes. Remove from the heat, stir in the rose water (or lemon) and set aside to cool. You could can this and process in a hot water bath or simply store in jars in the fridge.

08 January 2008

So Much To Say


I have so many things to say today. About the new and last season of The Wire, about the awful piece by Ayaan Hirsi Ali in the Times recently, about Michael Pollan's new book. Unfortunately, I have nothing to say about this fish dish I want to tell you about, other than that it was delicious. Nothing, nada.

This blog is supposed to share recipes with you all and reflect on life both inside and outside the kitchen, but sometimes it seems like that's not enough.It's the same reason I decided a dancing career wasn't for me: I love, love dancing, but I just had so many other things to say, and I couldn't say them with tendus. As Claudia LaRocco wrote in a line that struck a special chord with me: "modern dance can easily and intensely capture fleeting emotions and atmospheres, but it runs into difficulties when addressing complex social realities; its delicacy and precision don’t lend themselves to topics like women’s lives in fundamentalist Islamic societies."

Sometimes I feel the same way when writing about food: how many ways can I tell you that something is delicious or that I really liked it without being trite or (worse) preachy. Twice now I have sat down to write about this fish recipe: first writing about the great sweet-sour flavors of Iranian cuisine. The second time I set out to tell you about verjus, the sour juice of unripe grapes, a traditional by-product of any grape-growing region from France to Iran. Haaa-shhooo.... Oh, sorry, I'm even putting myself to sleep, blah-blah-boring, besides I couldn't even find verjus in stores.

So here you have it: a completely delicious dish of fish baked in a sweet-sour sauce flavored with pomegranate, orange, and lime. Sometimes food just needs to be eaten, not analyzed. Instead, if you want to talk about political primaries, sustainable development, a great new novel, or the best movie you saw recently, then I've got a lot to say.


Fish in Persian Sweet-and-Sour Sauce
This was inspired by a recipe by Najmieh Batmanglij which called for verjus (the sour juice of unripe grapes, not the alcoholic beverage) and Seville orange juice. Not having access to those ingredients, I came up with this version which has become a favorite in our kitchen. Serves 4.

olive oil
1 bunch scallions, white and light green parts chopped
2 cloves garlic, crushed
1 cup pomegranate juice or 1/4 cup pomegranate molasses with 3/4 cup water
juice from 1 large orange plus 1 teaspoon orange zest
1 cup tomato juice
1/4 cup lime juice
1/2 teaspoon salt
1/4 teaspoon each cumin, cinnamon, cardamom, and nutmeg
1 tablespoon sugar or honey
4 thick fish fillets (about 2 lb) like orange roughy, trout, or sea bass
1/4 cup flour

1. Combine pomegranate juice, tomato juice, orange juice and zest, lime juice, salt, spices, and honey in a bowl.
2. In a saucepan heat a few tablepoons of olive oil. Add the scallions and garlic and saute over medium heat until softened, a few minutes. Add the juice mixture and bring to a boil. Taste the sauce: it should be both sweet and sour, add more honey if necessary. Simmer for 10-15 minutes, then set aside.
3. Preheat oven to 450 F. Get out a large casserole or baking dish.
4. Pat the fish dillets dry and sprinkle with salt, then rub a thin sprinkling of flour on the fillets to coat on both sides. Heat a few spoonfuls of olive oil in a wide pan. Fry the fillets for 2 minutes on each side. You want the outside of the fillet to be "sealed" but the inside will not be done.
5. Place fillets in the baking dish. Pour the sauce over the fish and place in the oven. Bake 7-12 minutes, until the fish is just done. Serve immediately, with rice or bread.

04 January 2008

Never Too Late for Luck


By now, you've probably messed up your first few checks, replaced your calendar, and generally settled into a new year with a big fat round eight at the end of it. I'm not one for New Year's resolutions or much retrospection, but a new month at the start of a new year does encourage a bit of reflection. If you had asked me, I would have probably told you that 2007 involved a lot of waiting, several wrong turns, and a few frustrations. But when (while twiddling my thumbs on the train) I started listing the things that had happened in the past year, it looked like quite a lot:

- I made 20 ice cream recipes
- I left a job and a city I loved
- My significant other of several years became less significant and more other
- I found a new joy instead (albeit one who eats my shoes)
- I learned to do vrschikasana.
- I found a part of my family I had never known before
- I got a new job
- I'm moving to a different city
- I am finally learning to drive (about 9 years after I should have)

There are many more things I could add to that list, but it's quite a bit, really. I'll be starting a new job at the end of the month and will be in Washington, D.C. for the next three years. I'm a bit apprehensive about all of it, but I hope it will be new and exciting and challenging intellectually, plus it will be nice to be able to see my family and friends regularly without the medium of Skype. This blog will continue as usual, and I've already got some things tucked up my sleeve, including one of my absolute favorite Middle Eastern recipes and some other new-to-me discoveries.

My mom should get a big thanks this year, as she's played host to me in my transition, generously ceding her kitchen to my endeavors and also footing some major grocery bills. In our family, we've always had traditional foods for the new year: black-eyed peas (for seeing into the new year), collard greens (green for greenback$) and cornbread (for gold). I have no idea if any of those symbolisms are verifiable, but I've always liked the idea of them. Imagine my delight when, while traveling in northern Syria, I learned that they also eat black-eyed peas for good luck? In Aleppian Jewish tradition they eat black-eyed peas on Rosh Hashana (the Jewish New Year), usually with veal. The other traditional Syrian preparation of black-eyed peas involves the peas stewed with Swiss chard. This dish is literally a dead ringer for one you might find in the American South: swap the chard for collards and the Aleppo pepper for paprika and you've gone from one half of the world to another. I find these similarities terrifically fascinating, but then again I'm a total nerd.

The new year may have come and gone, but I say it's never too late for a little luck. Plus, this dish is really hearty and delicious: the peas are long-cooked so that they take on a sort of velvety smoothness punctuated by a hint of spice. You can serve it as a thick stew in bowls, dolloped with a little plain yogurt, or as I had it in Syria, ladled over rice.

So here's to 2008 and all the changes it may bring. I hope yours is healthy and happy and I look forward to sharing it here with you. And if you live in D.C. and see a girl in a brand new VW Rabbit, you might be advised to change lanes.


Black-Eyed Peas with Swiss Chard

splash of olive oil
1 thick-cut slice of bacon (optional)
1 medium-sized onion, diced
3 cloves garlic, sliced
1 bunch (~8 stalks) Swiss or Rainbow Chard, ribs removed and leaves roughly chopped
4 cups fresh black eyed peas or 1 1/2 cups dry black eyed peas soaked in water overnight
2 tablespoons tomato paste
pinch of salt
1 teaspoon Aleppo pepper or other mild red pepper

1. In a medium-sized pot, heat the olive oil. Add the onion and garlic (and bacon, if using) and saute until soft and translucent but not browned, 10 minutes. Add the chard, black-eyed peas, tomato paste and enough water to just cover the mixture by an inch and bring to a boil. Season with salt and turn down to a simmer. Simmer, stirring occasionally, for 45 minutes for fresh peas and 1 1/2 hours for dried peas. You may need to add a touch of water- it should be thick and stew-like. Stir in the Aleppo pepper and simmer another 2-3 minutes to combine. Taste for seasoning and serve warm.