31 October 2007

The Kibbe Equation


A friend and I were discussing recipes the other day, “wait a minute,” she said as I described a Middle Eastern pumpkin and spinach dish called kibbe yakteen, “I thought kibbe were little meatballs,” she asked. I paused, trying to describe how such a wide variety of dishes could all be called kibbe. Kibbe, one of the most venerated dishes of the Levant, is most commonly defined as a mixture of bulgur and ground meat usually in meatball-form. Bulgur, a by-product of the wheat harvest, is native to the areas of Lebanon and Syria where the dish is most common. But to call kibbe a meatball is to underestimate its crispy moist flavor and bypass its many variations. I think it is more useful to think of kibbe in specific terms, so I’ve come up with the following formula:

KIBBE FORMULA
__________________________________________________________
Outer Layer
Knead together filler+ bulgur + seasoning
filler options: ground beef/lamb, ground fish, pumpkin, potato, red lentils, semolina
_________________________________________________________
Inner Layer
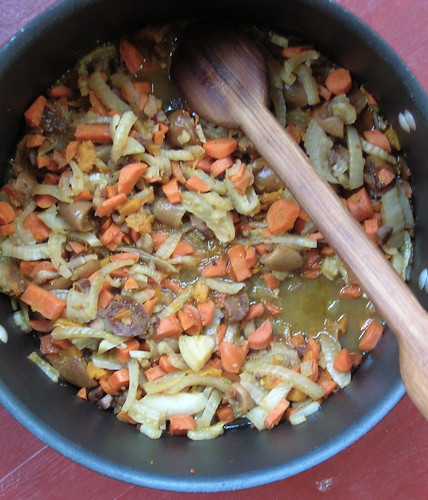
Saute together filler + seasoning + nuts
filler options: ground beef/lamb, caramelized onions, spinach, potato-herb, yogurt
_________________________________________________________
Technique
stuffed meat balls (deep fry or poach)
layered in a tray (bake)
raw kibbe (meat only, omit stuffing)
_________________________________________________________
Other Options
yogurt sauce, cherry sauce, quince-okra sauce, tomato-tamarind sauce, chard and walnut sauce, carrot-pomegranate sauce, beet-plum sauce, kishk sauce, poached in broth as soup, etc.
_________________________________________________________


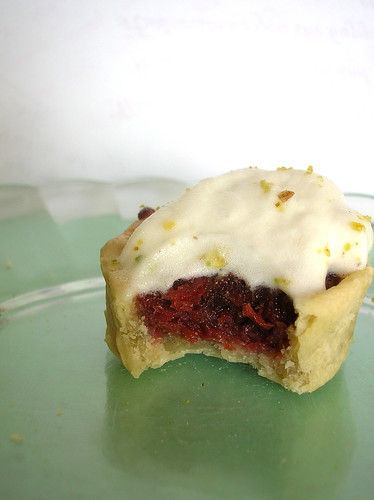
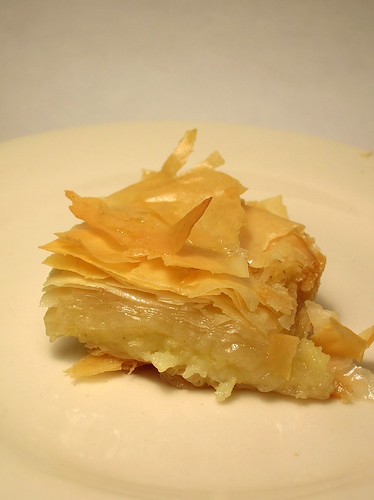
The most common form of kibbe uses meat in both parts: a meatball with an outer layer of ground meat and bulgur and an inner stuffing of sauteed ground meat and pinenuts. This is probably how you may have encountered kibbe in a restaurant- little torpedo shaped stuffed meatballs (British soldiers joked kibbe were Syria’s missiles during WWII). However, the “kibbe formula” can be extrapolated into all sorts of variations, the city of Aleppo alone claims sixty of them, including little meatballs in cherry sauce. In Tripoli, on Lebanon’s coast, ground fish and bulgur make up the outer shell, which is stuffed with a mixture of caramelized onions and pine nuts. Kibbe can also be baked in a tray, like a meat pie, and a popular version involves a potato crust and meat filling that’s evocative of shephard’s pie. Some kibbe have names associated with cities, like Nablus or Mosul, while others have names like “monk’s kibbe,” or “tank kibbe,” named because it’s so heavy, or “imposter kibbe,” a meatless version. And though somewhat outside the “formula,” no discussion of kibbe would be complete without mention of kibbe nayieeh- raw beef and bulgur pounded together, like a Lebanese tartar.

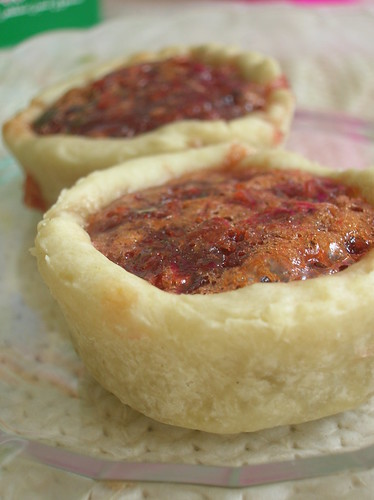
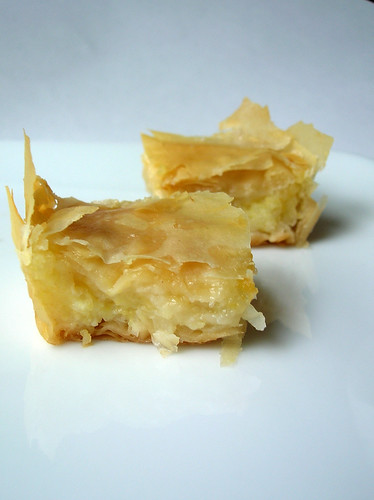
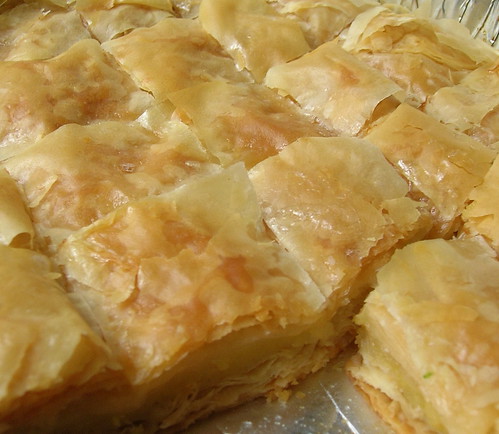
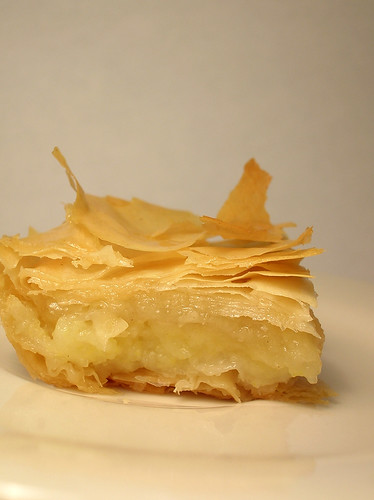
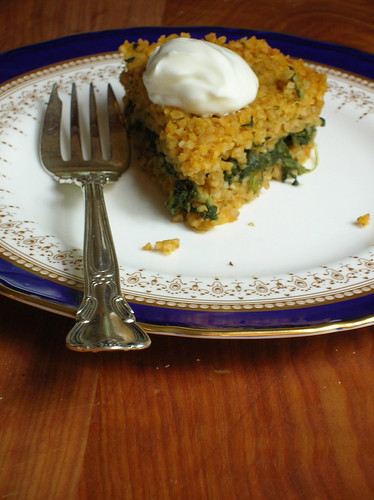
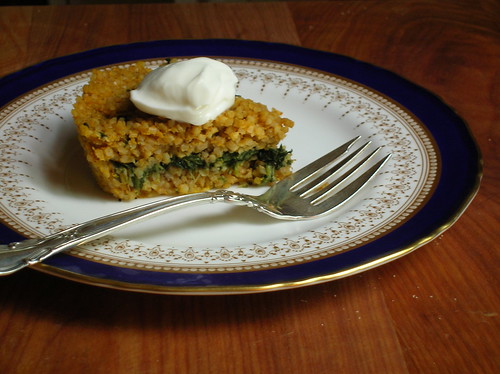
Keep in mind bulgur continues to absorb liquid as it sits- I didn't photograph the pie until several days after making it, hence the slightly more nubby texture seen here.

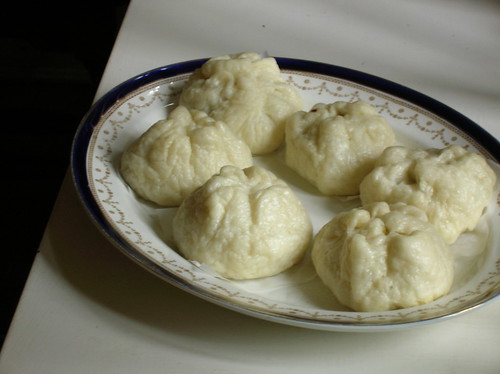
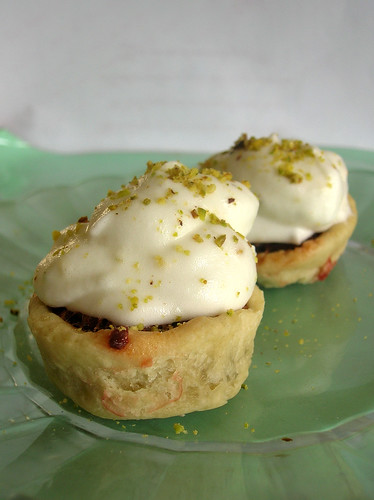
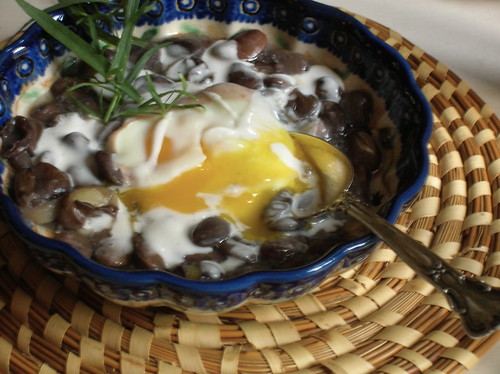
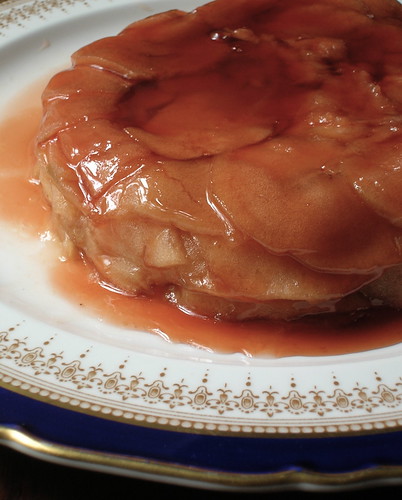
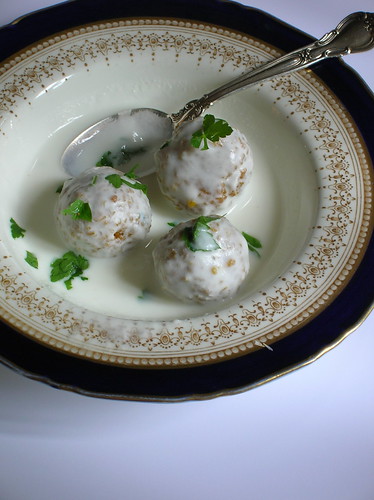
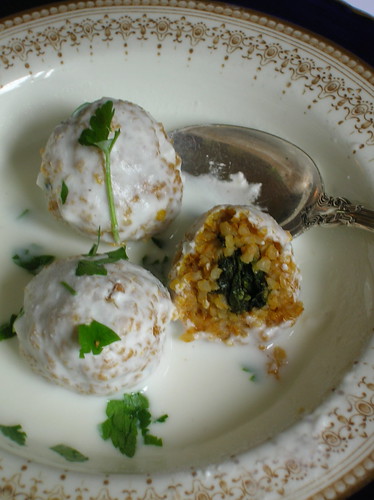
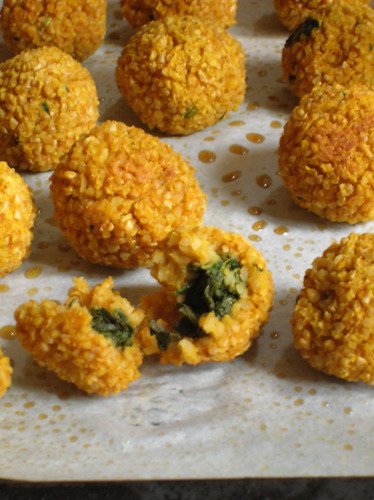
While kibbe is generally synonymous with meat there are many vegetarian versions, they were probably developped by Christians of the region who fast during Lent, but are also a good option for poor families that cannot afford meat. Which brings me back to that pumpkin and spinach recipe I referred to earlier. This unique Lebanese dish is comprised of pumpkin-bulgur dumplings stuffed with spinach and walnuts; I’ve chosen to serve it in a warm yogurt sauce, my favorite tangy counterpart. I realize that this discussion may seem esoteric, but in reality you can find all these ingredients at your local grocery (bulgur is often sold as “tabboule mix”). If you make the dumplings there’s no getting around the fact that it is time consuming, though it’s not particularly difficult. However, you can also make this in a casserole dish (I’ve done both here to demonstrate), in which case it comes together in mere minutes, and it smells wonderfully of pumpkin pie as it bakes. While I love the presentation aspect of the dumplings, the pie tastes equally as good and certainly wins when it comes to ease of preparation. My main piece of advice is not to skimp on the seasonings, it would be a shame to have such a beautiful dish risk being bland.


If you're new to kibbe, I suggest you try one of the more classic versions I've linked to above or head to a local Lebanese restaurant, but feel free to dive right in with this seasonal pumpkin version. And if you have a favorite version of kibbe or kibbe experience, please share it in the comments!

Pumpkin-Bulgur Dumplings with Spinach Stuffing in Yogurt Sauce
This is a beautiful and unusual Lebanese dish. You can make it in dumpling form, but it can also be baked like a casserole for an easier version, both are delicious. Bulgur is often sold as "tabboule mix" and is available in most groceries. Make sure to season generously. Serves 6.

for shell:
2 cups (10 oz) fine or medium-fine bulgur (often sold as tabboule mix)
1 1/2 cups pureed pumpkin (canned or homemade)
2 tbl grated onion
3 tbl flour
1 tbl cinnamon, 1/2 tsp allspice, 1 tsp salt
1 tsp Aleppo pepper or paprika
for stuffing:
olive oil
2 cloves garlic, minced
16 oz fresh spinach (can substitute frozen)
1/4 cup chopped walnuts
2 tsp pomegranate molasses or lemon juice

oil for frying

for yogurt sauce:
1 quart plain yogurt
1 clove garlic
1 squeeze of lemon juice
1 egg white
1 tbl cornstarch or flour dissolved in 2 tbl water

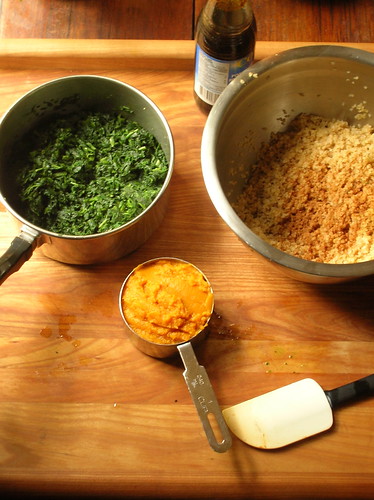
1. Make stuffing: Heat a glug of olive oil in a saute pan. Add the garlic cloves and saute for a minute to soften. Add the spinach (you may have to add it in batches to get it all to fit) and saute over medium heat for several minutes until wilted and dark green. Season with salt and add the walnuts and pomegranate molasses and toss to combine. Set aside to cool.
2. If you have fine bulgur (the consistency of cornmeal) you do not need to soak it. If you have medium-fine bulgur, pour hot water over it to cover. Let sit for five minutes, then drain thoroughly (I drain it in a cheesecloth lined mesh colander).
3. Combine the bulgur with the pumpkin puree, onion, cinnamon, allspice, salt, Aleppo pepper and flour. Using damp hands knead everything together for 5 minutes, until the mixture is cohesive. Let the mixture rest for 10 minutes. Knead the mixture one more time to combine- it should be more cohesive after resting, if it is too dry you can add a touch of water to loosen, or if it is wet add a bit of flour, though neither of these should be necessary.
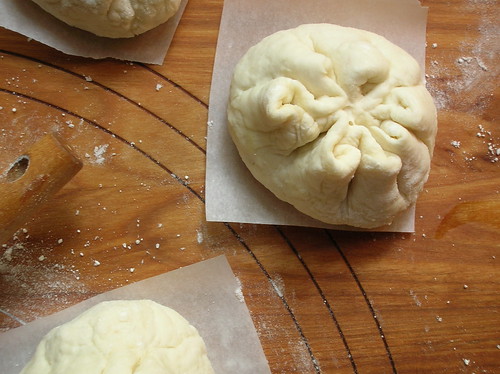
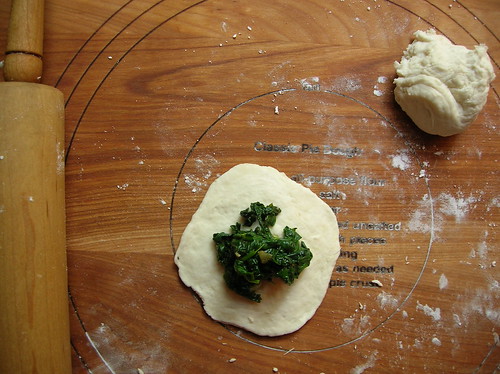
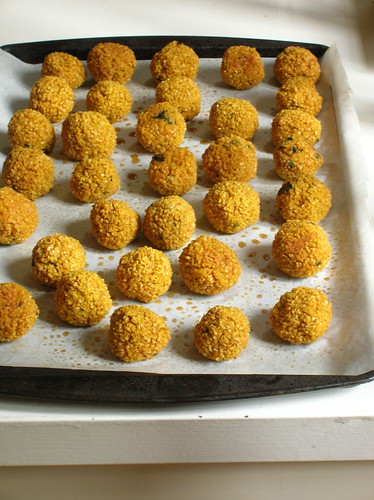
4. Form the dumplings: Work with damp hands to prevent sticking. Flatten a heaping tablespoonful of the pumpkin mixture in your palm, place a teaspoon of spinach filling in the center, then close up the pumpkin mixture around it. Place on a baking sheet and continue forming dumplings.
5. Place oil in a deep pot for frying. Heat the oil to hot (355 F) and fry the dumplings, a few at a time, for 3-5 minutes, until golden brown. Remove with a slotted spoon and drain on paper towels. Continue frying remaining dumplings.
6. Make yogurt sauce: Using a mortar and pestle or in a small bowl, smash the garlic clove with the lemon juice and a pinch of salt. In a saucepan off the heat, combine the yogurt, garlic mixture, egg white and dissolved cornstarch, stir the mixture gently until it is very well combined, smooth, and shiny. Place the pan on the burner and cook over medium heat, stirring constantly (do not stop stirring or it might curdle). Let the mixture come to a boil and simmer for a couple minutes (at this point you can consider the yogurt stabilized and relax the stirring somewhat). Thin the yogurt sauce with water to your taste (I use about one cup but use your own judgement). Remove from the heat.
7. Combine the yogurt sauce and the dumplings in a large serving vessel, or divide among serving bowls. Sprinkle with chopped parsley and serve immediately.

To make a pie:
Preaheat the oven to 350 F. Grease a 9” round pan generously with butter. Follow directions in steps 1-3 to make the pumkin and spinach mixtures. Place half the pumkin mixture in the bottom of the pan, spread the spinach mixture over top, then cover with the remaining pumpkin mixture. Score a diamond pattern on the top of the pie. Melt four tablesppons of butter and drizzle it over the top of the pie. Bake 30-35 minutes, until fragrant and golden brown. Serve in wedges, with plain yogurt on the side.
________________________________

Weekend Gardening Report


We've been working in a neighbor's garden- lots of overgrown basil. With the first frost imminent, we're putting out own garden to bed- cutting down, mulching. I took out the peppers, eggplant, and tomatoes and now we've got nearly 10 lbs of green tomatoes! Lots of tomatillos, too. Kale, broccoli, and beets are still going strong. The mesclun box has mustard, tatsoi, and 2 kinds of arugula. Don't be surprised if you see some green tomato recipes around here soon!

28 October 2007

Forbidden Rice Pilaf


Every time I walk into New York's Kalustyan's, an international grocery, I'm always entranced by the array of rice displayed along the right side wall. A veritable rainbow of Bhutanese red rice, green Bamboo rice, black japonica, Camargue red, purple jasmine, brown rice, wild rice, basmati, sticky rice, sushi rice, short grain, long grain, oh the possibilities! Of course, I'm always attracted to buy some, but the problem is we aren't really rice eaters. Sure, I stir up a risotto now and again and I'm the first to jump at an invitation for my friend's special Iranian pilaf, but overall we aren't big on the rice front. When my Chinese friend describes the number of rice cookers she has to put into use when her family visits I practically blanch in horror. And yet, everytime I walk into Kalustyan's I'm tempted, which is why I've got four unopened bags of rice in my cabinet.


I decided to put some of that rice to good use, "look, this one's called forbidden rice, it says it was prized by Chinese emperors," I said as I pulled it from the cabinet. P. who lived in Hong Kong, just laughs at me, "they call everything in China 'forbidden,' '' he says. Yes, it's probably a marketing ploy, but the fact is this Chinese rice has a lot of other things going for it. The rice is an heirloom Chinese variety whose black color comes from its whole bran exterior. This means it is high in fiber and the deep purple hue it emits hints at a wealth of phytonutrients and iron, another reason you can find it at many health food stores. But most importantly, the rice is delicious, with a deep nutty taste and aroma. I combined it with soy-glazed carrots and red pepper and scallions, not a traditional recipe, but certainly a delicious one. It's one of those dishes that you find yourself shoveling one forkful after another, scooping up soft little grains and salt-edged vegetables in every delectable bite. At dinner there were no jokes about forbidden emperors, only a nice story about traveling in China, told between approving gusty bites. Which was a good beginning, because we still have three and a half bags to go.

With October 31 around the corner, I can't help but think this orange-and-black dish is perfect for the holiday. Happy Halloween!


Forbidden Rice Pilaf
An heirloom variety of Chinese black rice sometimes called forbidden rice, it is available at many health food stores and gourmet markets (do not confuse it with Thai purple sticky rice, which must be handled differently). Serves 4.

1 1/2 cups Chinese black rice
3 cups water
olive oil, salt
1 red bell pepper, diced
2 large carrots, peeled and cut into small dice
3 tbl soy sauce
1/2 cup chopped green onions (scallions)

1. Rinse the rice in three changes of water, until the water begins to run clear (the water will still be a little purple, but should not be cloudy). Bring the three cups of water to a boil with a pinch of salt. Add the rice to the boiling water, cover the pot and simmer over low heat for 35 minutes, until rice is tender and water absorbed.
2. Meanwhile, choose a pan with a tight-fitting lid and heat some olive oil in it. Saute the bell pepper until softened and darkened in a a few spots. Set the pepper aside. Wipe out the pan and heat some more olive oil in it. Add the carrots, stirring to coat them in the oil, then cover the pan with the lid and turn the heat to very low. Sweat the carrots until softened, about 15-20 minutes (you should not need to add any liquid to the pan, but if it looks dry you can add a bit of water). Uncover the pan, raise the heat to medium, add the soy sauce and swirl around so that the sauce reduces a bit and coats the carrots. Remove the pan from the heat and stir in the reserved bell pepper.
3. When the rice is done, combine it with the carrots and pepper and taste for seasoning. You may want to add a bit of red pepper, or a few more drops of soy sauce. Turn rice out onto a platter. Top with the scallions. Serve immediately.

27 October 2007

Pumpkin Gingerbread


The other day I was working on a recipe and I Googled the words "pumpkin dumplings" and among the results that came up was a recipe for pumpkin gingerbread. Hmmm, I don't know if Google needs a cooking lesson, but I immediately thought that pumpkin gingerbread sounded really good. Now is the season for winter squash gluttony, everything from pumpkin soup, pumpkin cannelloni, pumpkin butter, pumpkin pancakes, but somehow the idea of a pumpkin gingerbread had never crossed my mind before (I usually make this pumpkin loaf). So later that week after I had made the dumplings, there was leftover pumpkin puree sitting in the fridge and I saw my opportunity.

It's been horribly rainy and cold here, I've come home with soaking wet shoes and pants every day this week, and telling myself it's good for the plants does not make my toes feel any warmer. And after arriving home I get to go back outside and stand in the rain some more with our new little puppy saying, "please, please just pee so we can go back inside now." She, apparently, would rather roll in fronds of wet loriape than go inside and make gingerbread. I need to work on that.

Back inside, I turned the space heater directly towards my wet toes, warmed fingers over the heating oven, and stirred together the batter. As it baked, the house filled with its sumptuous smell, soothing frazzled weekday nerves and melding with the patter of rain outside. Judging by how fast it was devoured (less than 48 hours?) and the fact that it comes together in mere minutes, I'd say this recipe is a keeper. I'd even withstand a few more rainy days, and look forward to the coming cold nights, if this gingerbread is on order.


Pumpkin Gingerbread
Moist with pumpkin and warm with spices, this autumn quick bread comes together in minutes. We like it sliced and spread with cream cheese.

2 cups flour
1/2 cup brown sugar
2 teaspoons baking powder
1/2 teaspoon baking soda
1 tsp each cinnamon, allspice
1/4 tsp each cloves, nutmeg, ginger
1 cup pureed pumpkin (homemade or canned)
1/2 cup molasses
2 eggs
1/3 cup vegetable oil
1/4 cup milk

1. Preheat oven to 350 F. Grease a 9" loaf pan. Combine dry ingredients (flour, sugar, leavening, spices) in a large bowl. Combine the wet ingredients (pumpkin, molasses, egg, oil milk) in another bowl. Add the wet ingredients to the dry ingredients and stir with about 10 vigorous strokes to combine.
2. Pour into prepared pan. Bake ~45 minutes, or until a toothpick inserted into the center emerges clean. Cool on a rack.

23 October 2007

To Chinatown and Back


Is it possible to be homesick for a place that isn’t home? When I was in college I went off to the Middle East for the first time, to study in Beirut for the summer. I came back to New York, to my usual routine, terribly nostalgic for the world I had discovered. Where were the sidewalks pockmarked by rubble and bomb holes, where were the collapsing Ottoman mansions, the crusader castles, the artichoke fields, the night clubs built into converted bunkers? I missed the markets teeming with gorgeous produce, fish flapping in the market in Tripoli, the array of sweet biscuits in Saida, the call to prayer. Back in the U.S. I wanted desperately to feel like I was somewhere else, in a city that prides itself on anonymity, I wanted to feel like an outsider.


I found what I was looking for on the streets of New York’s Chinatown: sure the culture was different, but there were the bustling street vendors, the piles of unusual vegetables. Everything was written in a different alphabet, people bargained fiercely in a foreign language, and I was the only American around- I felt right at home. A stroll through Chinatown became part of my regular Sunday routine, I even started noticing similarities between the two cuisines, the mooncakes that resembled Middle Eastern date cakes (mamoul). Often, I stopped for a puffy roast pork bun, char siu bao, or did my grocery shopping, stocking up on Chinese buns for the freezer or uber-cheap fresh bok choy and seafood.

Fast forward several years, I was living and working in Damascus, and as much as I love Middle Eastern food, I was craving something different. I missed all the different ethnic eateries New York has to offer. I missed those puffy Chinese-style buns, and with no Dynasty supermarket nearby, I decided to try and make my own. With little access to pork in a Muslim country, I made a simple spinach filling, and I was happy to find that since the buns are steamed I didn’t have to fiddle with my troublesome (fear-of-death inducing) oven.


Since that first time I’ve made many batches of Chinese-style buns, and though my bun-shaping skills have improved, they never look like the gorgeous ones of Chinatown (maybe if I got a proper bamboo steamer). It doesn’t matter, because we love the supremely light texture of the bread that comes from their long rise, they’re the perfect partner to soup or something saucy to dip them in. I actually prefer the spinach filling, but you can use any mixed vegtables or shredded meat, I once saw a version that used whole-wheat flour and mushroom-cashew filling. Though these are a bit of a time investment to make, they freeze beautifully, I often keep a bunch in the freezer for those nights when you get home late and want something quick. I had to go half-way around the world more than once to discover these homemade buns, hopefully you’ll discover their joys right at home.


Chinese-Style Spinach Buns

for the dough:
1 cup warm water
1 package dry yeast
3 tbl sugar
3 cups cake flour, plus more for kneading
1 1/2 teaspoons baking powder
for the filling:
12 oz fresh spinach (can substitute frozen)
2 tbl vegetable oil
1 clove garlic, sliced
red pepper, to taste
3 tbl soy sauce

1. Make filling: Wash the spinach and leave some of the water clinging to it. Roughly chop the spinach. Heat the oil in a saute pan and saute the garlic until beginning to soften, about a minute. Add the spinach and toss over moderate heat (you may have to add the spinach in batches to get it all to fit in the pan). Toss the spinach until wilted and dark green, but not completely collapsed, several minutes. Remove the pan from the heat and stir in the soy sauce and season with red pepper. Set aside.
2.Make dough: Place the warm water in a large bowl, add the sugar and yeast and set aside until foamy, about 5 minutes. Add the 3 cups of flour and knead in the bowl until the flour is incorporated (if it is very sticky you can add 1/4 cup more flour). Turn out the dough onto a floured surface and knead for 5 minutes, until elastic and smooth but still soft. Place the dough in an oiled bowl, turning the dough to coat, cover with plastic wrap and let rise until doubled, about 1 1/2 hours.
3. Punch down the dough and flatten it into a disk. Sprinkle the baking powder over the dough, then fold the dough over and knead to incorporate the baking powder. Let rest covered 30 minutes (meanwhile, cut 12 squares of parchment paper).
4. Form buns: Form the dough into a log and pinch off 12 equal pieces. Roll the dough pieces into a circle, using the rolling pin to make the edges of the circle thinner than the middle. Fill the dough with a spoonful of spinach. Gather up the edges of the dough, pleating them as you gather, then form a circle with your thumb and forefinger and squeeze the pleats closed. Place on a parchment square. Repeat to form remaining buns. Let the buns rest, covered, for 20 minutes, until puffed. Meanwhile, prepare a vegetable steamer.
5. Place the buns (on their parchment squares) in a steamer. Cover and steam 10-15 minutes, until puffed and heated through. Serve immediately.
________________________________

19 October 2007

Morning of Roses


In Arabic one says good morning “sabah al khair,” and in response one says “sabah al-noor,” which literally translates as “morning of light.” You never say sabah al-kheir in response to the first greeting. Besides the standard sabah al-noor, there are many other possible responses to say good morning, including: sabah al-ward- morning of roses, sabah al noum- morning of sleep, and even sabah al ashta- morning of cream. Sometimes Arabic is so cool.

I love exchanging morning greetings with my Arabic-speaking colleagues, and of all the expressions, “morning of roses” is my favorite (it's also the title of an Egyptian short story). And if my mornings aren't always rosy (more like a hectic rush of trying to get everything organized before running out the door), they are at least full of rose petal jam. Of all the foods I’ve discovered in my travels, rose petal jam is probably the one that has captivated me the most. There is something magical about eating a mouthful of flowers, and the taste is sweet and thick with a slightly-squeaky texture of petals and a fragrance unmatched by any perfume. Rose petal jam is one of the items I always make sure to have in my pantry, as essential as bread and butter. Most often, I slather a thin piece of flatbread with some yogurt and rose jam and then roll it up for a spiraled pink breakfast on the run. But I’ve also been brainstorming ideas for desserts using rose jam:

Rose-Yogurt Mousse: rose jam + thick yogurt + whipped cream.
Rose Trifle: cake cubes + rose jam + custard
Rose Linzertorte: classic linzertorte except made with a pistachio crust and rose jam


In my experience not all rose petal jams are created equal, and their quality can vary widely. The best I’ve ever had was from Baleed, a specialty store in Damascus, while Paris’ Hediard charges $10 for one that is watery and disappointing. Most import stores carry a decent Greek or Lebanese version, and in New York Kalustyan’s house-made version is quite good. I had hoped to have a rose jam recipe for you today, but I haven’t quite perfected one yet, so in the meantime you can pick up some jam (or order it) and make these little tartlettes.

Of course, jam tarts are nothing new, but I think the rose jam gives them a special spin. I originally topped these with ‘ashta- a kind of Lebanese clotted cream. Ashta is almost always purchased from pastry shops, and though there are recipes for a homemade imitation, it doesn’t whip up like the real thing. Instead, simple whipped cream with a bit of mascarpone makes a great substitution, accented with a bit of pistachio. You could make these with any jam you like, but with rose jam you can have mornings, or evenings, of roses.


Rose Jam Tartlettes with Cream Topping

1/2 recipe Pâte Brisée or pie crust
1 cup rose petal jam
1 egg
1 tbl orange zest
for topping:
1 cup heavy cream
1/4 cup mascarpone
2-3 tbl sugar
1 tsp each orange flower water and rose water
1/4 cup finely chopped pistachios

1. Preheat the oven to 350 F. Prepare the crust and fit it into mini-muffin cups or tartlette pans.
2. Stir together jam, egg, and orange zest and fill tartlettes. Bake 10-15 minutes, until set. Let cool thoroughly on a rack.
3. Meanwhile, use an electric mixer to beat together cream and mascarpone until they hold stiff peaks. Beat in the sugar, flower water, and two tablespoons of the pistachios. Before serving, dollop cream over tartlettes. Sprinkle the remaining two tablespoons pistachios over the top of the tartlettes.

* 'Ashta is a kind of clotted cream similar to the Turkish kaymak.
**Rose jam is usually made from roses like beach roses, rosa rugosa, or rosa damascena. Here's a rose jam recipe. Flower jams can also be made with other edible flowers like jasmine petals, violets, orange blossoms, or almond blossoms.

16 October 2007

Squash, Fig, Fennel, and Chestnut Ragout


Now is the time of year when the bees die right on the flower. I saw one the other day, curled tightly in the petals of a butterfly bush, and I wondered if it died in a final exultation of pollinated pleasure or simply passed away in its sleep. The temperatures are finally dropping, we have several potted plants that don't like below 50F, so I brought them in last night and they crowded by the front door like children waiting for recess. They'll migrate indoors and out for a while before finally coming inside for the winter.

I've been gathering fall ingredients around me: pumpkins for carving and eating, apples from our neighbor's tree, chestnuts that went into a cake you will hear about soon. I got some dried figs too, unlike other dried fruits dried figs have a specific season, usually fall and early winter. Due to their high residual water content, dried figs only last a few months and the best kind are those from Turkey.

As I surveyed our provisions this weekend, I decided to turn those squash, chestnuts, and figs into a simple autumn ragout- it needed something else savory and I chose fennel bulb, with its sweet onion-like taste and hint of spice. I love a good ragout, in the spring with favas, in the summer a ratatouille-esque mixture, and now this one for fall. And though I just threw it together in its simplest form, this ragout is really a winner, I'm already considering it for a place at the Thanksgiving table. I had in mind to post something else today but the ragout just had to be shared, vying for attention like those plants by the front door.

I really love this dish in its five-ingredient simplicity, but it is welcome to interpretations. A splash of Riesling wine at the beginning would be the perfect accent, a few shredded apples a nice touch, use dates or raisins in place of figs, onions in place of fennel, a drizzle of pomegranate molasses, you get the idea. But I like this dish just as written, it reminds me of scarves and jackets and crunchy leaves and mostly, it tastes like fall.


Squash, Fig, Fennel, and Chestnut Ragout
This wonderful autumn ragout is welcome to all sorts of additions and substitutions, but I love it just as written. I use both squash and carrots because the squash will fall apart in the long cooking, while carrots hold their shape.

1 small fennel bulb (or half a very large one), cored and sliced
2 cups diced winter squash (such as pumpkin, butternut, acorn squash)
3 carrots, cut in small dice
6 dried figs, stems removed and quartered
1/3 cup finely chopped cooked chestnuts
optional for serving: pomegranate seeds

1. Heat a glug of olive oil in a skillet or wide pan. Add the fennel and carrots and saute until the fennel is softened. Add the squash, chestnuts and dried figs and add enough water to half-way cover the vegetables. Season with salt, stir everything around to combine, then cover the pan and turn the heat to low. Simmer over low heat, covered, for 45 minutes, stirring occasionally. Serve warm, garnished with pomegranate seeds if desired.
____________________________

15 October 2007

Speckled Butter Bean Shakshouka with Yogurt Sauce


I grew up going to farmers markets and roadside stands where fresh shell beans were readily available. My family is from the south, which means fresh butter beans, baby limas, and black eyed peas are held in high regard. As much as I love New York and its Greenmarket, it is rather lacking in the fresh bean arena. I guess New Yorkers just aren’t beans people. That’s too bad, because fresh beans are wonderful: they cook up in minutes, and they’re far superior to canned beans and much easier than rehydrating dried beans. This past week I was delighted to see an array of fresh beans in Maryland, beautiful coolers full of slippery black beans, limas, crowder peas, and speckled butter beans.

Shakshouka is a Middle Eastern dish in which eggs are poached in a simmering vegetable mixture. The most traditional version of shakshouka involves eggs in a spicy tomato sauce, but it can also be made with beans or other vegetables. In the spring, shakshouka is made with a fresh fava bean and artichoke mixture, and in winter the eggs can be poached in a stew of dried fava beans and sausage. I’ve reinterpretted this Middle Eastern dish with American ingredients, using those speckled butter beans. Shakshouka is often served with a yogurt sauce made of yogurt and tahini, but to keep in the American way I’ve used peanut butter. Yogurt and peanut butter may sound like an odd combination, but they make a delicious sauce. This makes a nice brunch dish or a simple dinner, and make sure to have some toast or flat bread for mopping up the juices.


Butter Bean Shakshouka with Yogurt Sauce
If fresh beans aren’t available you can substitute 3 cups cooked beans and reduce the cooking time slightly. For those who can’t have a meal without meat, some chunks of merguez sausage make a good addition. Serve with pita bread or toast. Serves 4.

1/2 a medium onion, chopped
1 clove garlic, minced
1 lb fresh shell beans, like lima, butter, or fava beans
1 sprig thyme, optional
juice of half a lemon
4 eggs
olive oil, salt, red pepper
for yogurt sauce:
6 oz. plain yogurt
1 heaping tablespoon peanut butter or tahini
squeeze of lemon juice

1. Heat a glug of olive oil in a wide skillet or dutch oven. Saute the onion and garlic over medium heat until soft and translucent. Add 2 cups of water to the pan and add the beans and thyme, there should be enough water to half-way cover the beans. Season to taste with salt and red pepper. Simmer the mixture for 15-20 minutes until the beans are tender, adding water as necessary. Squeeze in the lemon juice.
2. One at a time, crack an egg and slide it into the simmering bean mixture, spacing them evenly in the pan. Place a lid on the pan and simmer over low heat until the egg whites are opaque and the yolks are soft set but still runny.
3. Scoop some of the beans into your serving bowls, then gently scoop an egg into each bowl. Stir together the yogurt, nut butter, and lemon. Drizzle the yogurt sauce over each bowl. Serve immediately with bread.

12 October 2007

A Baklava Worth Searching For


Custard-Filled Baklava (Baklava Muhalabiyya)

Ramadan ends on October 12th this year, depending on the sighting of the moon, and that means the start of the biggest Muslim holiday, Eid al-Fitr, a three day celebration marking the end of the month of fasting. Often referred to simply as Eid, the holiday, it is marked by celebrations in the streets, booming canons, fireworks, ritual lamb slaughterings, and lots and lots of food. All throughout Ramadan pastry shops put out their best pastries every afternoon, and beautiful breads, baklava, and candies are part of the evening fast-breaking. Last year I was living in Damascus and I was captivated by the array of sweets, so many things I had never seen or tasted before, and I made quick business of sampling many of the exquisite treats. By the time Eid rolled around I was in such a sugar-coma, I couldn’t bear the thought of another piece of pastry and my stomach turned at the thought of baklava. However, there was one exception, one pastry to which I had developed a drug-like addiction.

The problem was, I had no idea what the pastry was called. It was available at all the pastry shops, but whenever I asked the name, I always got a different name or description, and my friends were no more helpful. A problem I have often encountered in exploring Arab cuisine is the lack of clear names for dishes: because the food is familiar to locals, it is generally assumed everyone knows what it is and so they aren’t very good at describing it. The pastry in question was similar to baklava except it had a creamy white filling: that wasn’t very helpful either because traditionally most Ramadan desserts are white or have a cream-filling (white being the color of purity for the holy month).

It took me lots of asking, a dozen cookbooks, and a bit of detective work to figure out exactly what I was looking for. When I finally learned the name of this now-mythic pastry, the ingredients in the filling were quite a surprise to me. The name, baklava muhalabiyya, refers to a simple milk pudding (muhalabiyya) thickened with semolina or rice flour which makes up the smooth-textured filling. The milk pudding alone is a common dessert, and so baklava muhallabiyya is simply a combination of two classic desserts. Once I knew the name all of a sudden I was able to find plenty of recipes and variations for this dessert. It is very similar to the Greek dessert galaktoboureko, the exception being the Greek version adds eggs to the filling, which in my opinion makes the dessert a bit too rich.
I know the idea of making your own baklava may be a bit intimidating, and even in the Middle East this is a task usually left to professionals. However, this is one of the few types of baklava often made at home (sometimes it’s also made as triangular turnover shapes called shabiyyat), and it’s pretty user friendly. For best results I recommend using ghee or clarified butter. It is basically butter where the milk solids and water are removed through slow cooking, the nature of this butter yields the best texture to the phyllo layers, both melding together and crispy crunchy.

The result is the pastry I worked so hard to replicate: something so addictively good I almost never let myself make it. My friend Tasha calls it the best baklava she’s ever had, and while I won’t make such grand claims, don’t be surprised if you hear accolades. This year I learned from my experiences and I’ve saved plenty of room for baklava on Eid. Here’s wishing everyone a happy holiday and a sweet year to come!


Custard-Filled Baklava (Baklava Muhalabiyya)
If you haven’t worked with phyllo before, check out the tips below. Unlike other baklavas, this is best within 2-3 days of making, after which it may get a bit soggy, but I’ve never had it last that long anyway. You probably won’t use all the butter, but it’s always good to have extra rather than not enough.

20 sheets phyllo dough, defrosted if frozen
1 cup samne, ghee, or clarified butter*, melted
for filling:
1/3 cup semolina or white cornmeal
1/4 cup sugar
2 cups milk
1/4 tsp each, cinnamon, nutmeg
pinch salt
for syrup
1 1/2 cups sugar
1 cup water
2 tbl orange blossom water, rose water, or lemon juice

equipment: pastry brush

1. Make syrup: Place sugar, water, and flower water in a saucepan. Bring the mixture to a boil, stirring so that the syrup dissolves. Let boil for a couple minutes, until it is a thick clear syrup, then set aside and let cool completely.
2. Make filling: Place milk, sugar, spices, and salt in a sauce pan. Bring the mixture to a simmer, stirring so that the sugar dissolves. Add the semolina in a slow stream, stirring to combine. Simmer the mixture over low heat, stirring constantly, until the mixture is thickened and the semolina is soft, about 10 minutes. Set aside to cool completely before using.
3. Preheat the oven to 350 F. Have your melted butter and pastry brush ready. Get two cloths or dish towels, moisten them, then wring them out as much as possible.
4. Unroll your phyllo on your work surface and cover it with plastic wrap then cover with the damp cloths. Brush a 9 inch baking dish all over with some of the melted butter. Brush one sheet of phyllo lightly with the butter, then place in the baking dish, letting any extra come up the sides. Repeat, brushing a phyllo sheet with butter and layering it in the baking dish, keeping the remaining phyllo covered, until you’ve used half the phyllo.
Pour the pudding filling into the dish and smooth the top. Continue brushing phyllo with butter, then layering it on top of the filling, allowing the edges of phyllo to hang over the sides of the pan. When you have layered all but 2 sheets of the phyllo, take all the pieces of phyllo that are hanging over the sides and fold them back into the pan, (some of the edges may be dry, you can snap them off and discard them), Brush the fold overs with butter. Brush the final 2 sheets of phyllo with butter and place them over the pan, tucking the edges down into the side of the pan. Brush the top with melted butter.
5. Score the top layer of the pie to form small squares, then run your knife through the scores again, cutting all the way through to the bottom the pan. Place in the oven and bake 30 minutes, until crisp and golden.
6. Remove from the oven and immediately pour the cool syrup slowly over the pie. Set aside to absorb for several hours before serving.

Helpful Tips:
1. When working with phyllo, it’s important to work quickly to keep the dough from drying out. In order to do so, make sure you have all your ingredients and tools ready, and know what you are going to do. Read through the recipe several times to familiarize yourself with the process, this will help prevent you from constantly stopping to check the recipe, which will slow you down.
2. Never leave phyllo uncovered for more than a minute.
3. Brush each phyllo sheet lightly with butter, beginning at the corners and working inward. You want to brush it with enough butter to prevent dryness, but you don’t want to saturate it so that it’s heavy or soggy
4. Make sure your syrup is cooled before you use it. Cool syrup + hot phyllo = crispy baklava.
5. Don’t worry! It’s a more forgiving process than you think and even less-than-perfect attempts are bound to yield delicious results.

*Samne is an Arabic type of clarified butter similar to the Indian version ghee. You can purchase samne or ghee at most international markets. You can also make your own clarified butter, make your own ghee, or substitute regular melted butter.

09 October 2007

Overnight Apple Cake

Just sleep on it. It's advice often given when contemplating a decision, as if through the transformative process of the night, the issue will emerge clarified. As a kid when my friends and I had sleepovers, we'd often try and stay up all night in an act of youthful defiance: we never quite succeeded, succumbing if not to sleep then to bleary-eyed silence. I have long believed that there is a moment in each night, somewhere between the late-night revelers and early risers, where everything is still. One moment where everything rests, pauses, comes into alignment, before proceeding again on its way. By its very nature, this is the one moment where your eyelids will flutter and you will drift off for a second, but if you concentrate hard and listen very carefully, you'll catch it.


If you've ever baked you know that yeast doughs are often left overnight, and that extra rest can give the dough or sponge magical lifting power. That idea of overnight magic is what attracted me to a little recipe for an apple cake: sliced apples are layered with some sugar and baked slowly overnight. In all honesty, I was sure it wouldn't work, the photo in the book was so beautiful it couldn't have resulted from a process so simple. However, my mom's neighbor offered to share the bounty of her apple tree, and with a surfeit of apples, it was little cost or labor to give the recipe a try. Last weekend I took the puppy and a basket and (feeling rather farmer-ish) headed down to pick some apples.


Pat had told us the apples were quite tart, and indeed they were inedibly astringent, only for use in cooking. I increased the amount of sugar in the recipe accordingly and slipped the apples into that oven that evening. By the time I had gone to bed the kitchen was wafting wonderful smells. The next morning when I opened the oven it was like I had stuck my nose in a dozen apple pies, an intoxicating complex scent. Drizzling the reduced juices over the cake, I was pleased to see it really was looking like the photo. But the real surprise was the taste: as outstanding as the lovely layered appearance. My mom, who has waxed rhapsodic about tarte tatin, called it "the best apple dessert I've ever had," and that's saying a lot. I'm inclined to agree. Because this is ready in the morning, it could be nice for breakfast with some sweetened yogurt, but if you can wait it's truly outstanding with vanilla ice cream. All it takes is a little overnight magic.


Overnight Apple Cake

4 pounds tart cooking apples, like Granny Smith
1 orange
3/4 to 1 cup sugar, depending on your apples
2 tbl butter

1. Preheat the oven to 175 F. Choose a 6-cup souffle dish, generously grease it with one tablespoon of butter. Cut a round of parchment to fit inside the dish, generously grease it on one side with the remaining tablespoon butter.
2. Place the sugar in a bowl. Zest about 1 tablespoon of the orange zest into the sugar bowl, rub the zest into the sugar with your fingertips. Halve the orange and squeeze its juice into another bowl. Peel the apples, core them, and thinly slice them into rings (if you don't want to bother coring, simply halve them and thinly slice). Add the apple slices to the bowl with the orange juice as you work to prevent discoloring, tossing them to coat.
2. Layer the apple slices, overlapping them, in the prepared dish, sprinkling each layer with a little of the sugar. Place the parchment round, buttered-side down, over the apples. Place in the oven for 12 hours.
3. Remove the apple dish from the oven, there should be a good amount of bubbling juice. Pressing down on the parchment with an oven mitt, pour off the juice into a sauce pan. Bring the juice to a simmer and boil until brightly colored and thickened. Meanwhile, invert the apple cake onto a serving plate. Drizzle with the juices.

I should note dear Molly had some trouble with the original recipe. I believe because she used less sugar, not only was the cake too tart, but the apples didn't render enough juices. The pectin in the reduced juices holds the cake together and gives the pretty shiny top.
___________________

08 October 2007

Squirrel 3, Me 1

All summer I watched our fig tree with baited anticipation. I adore figs and our nascent tree, though grown in a pot and only in its first year, was vigorous and healthy. With it, the promise of fresh-from the-tree-figs, budding heartily on its stems, tantalized me everytime I spied it by the back deck. It only had about five fruits, but I watched them ripen in painstaking slowness over August and then into September, peering at the fruits, practically drooling as as they slowly turned from bright green to deep brown.

All summer, we have also been plagued by drought-like conditions and by several crazy squirrels. I grew up hearing my mother curse the squirrels that dug up her garden and which would climb in through our chimney and run in the space between the walls on winter mornings, their scampering claws on the eaves above my head a six a.m. wake-up call. Now, a couple decades later, I am once again plagued by a crazy squirrel: one afternoon I watched as it literally turned flips in some sort of hyper-active fit. It systematically chewed the coleus plant, chewing one stalk each day until the plant was completely stripped. We've invested in several "squirrel proof" birdfeeders, only to find the squirrel has dismantled them, sending them smashing to the ground, and even prying the top off of them and climbing inside to feast glutinously in a sea of sunflower seeds.


"Squirrel-Proof" Bird Feeders, Coleus Plant Before and After

When watering our plants one day, I noticed our figs were ready: ripe, plump, brown figs!! A few hours later I returned, only to find a cruel surprise: the tree bore no hint of fruit. It seems the squirrel had beat me to it, stripping the tree and devouring its luscious fruits leaving not even a nubby stem behind. To say I was devastated would be an exaggeration, but I was truly saddened that I wouldn't get to taste the fruits of a long, hot summer's labor.


Determined to turn our fig tree into some sort of gustatory pleasure, I remembered a recipe that called for salmon wrapped in fig leaves. Wrapping fish in leaves, like grape leaves or chard leaves, is a common Mediterranean practice but using fig leaves is unusual because they are rather tough and inedible. I first read about the recipe in that lovely children's book Fanny at Chez Panisse, and if you remember a recipe you heard about when you were seven, it ought to be worth making. The salmon fillet at the shop was beautiful and I added a dose of lemon for good measure and wrapped it in the fig leaves, adding some beet greens on top to keep the unwieldy leaves in place.

As the fish roasted, the house started to fill with the most amazing aroma: the smell of coconut. Fig leaves, when cooked, give off the most tantalizing coconut-like smell, I wouldn't have been surprised if my neighbors had come knocking on my door in search of the glorious source. Thankfully, none did, because I don't think we would have wanted to share, the fish was knock-out good. Of course, a lovely fillet of salmon perfectly roasted is bound to be good, but I can't help think that coconutty fig leaf aroma had a lot to do with the magic. If you don't have access to fig leaves (and I am afraid of stripping our baby tree any further), give it a try with hearty leaves like beet or chard, it will still be delicious. And in the battle of me versus squirrel, the squirrel might still be ahead but I've got one very happy victory under my belt.


Salmon Roasted in Fig Leaves
Fig leaves give off the most amazing coconut-like smell when roasted, but if you don't have them substitute a firm leaf like beet, turnip, or chard greens. Serves 6. Adapted from The Chez Panisse Cafe Cookbook.

12 large fig leaves, or beet greens or chard
2 to 2 1/2 lb fillet of salmon
1 lemon
coarse salt, olive oil

1. Preheat the oven 400 F. Lightly oil a large casserole. Wash the leaves well and place enough fig leaves shiny-side up to cover the bottom of the dish. Place the salmon fillet over top. Grate a little of the lemon zest directly onto the salmon, then halve the lemon and squeeze half the juice over the fish. Sprinkle with salt. Fold the leaves up around the salmon fillet, and place several more leaves over top to hold the leaves in place. If your leaves are uncooperative, you can try and tie them in place with a bit of kitchen twine. Drizzle some olive oil over the outside of the fig leaves. Place in the oven and roast for 20-25 minutes, or until fragrant and the fish is plump.

For a fancier presentation: Cut the fillet into serving size pieces. Wrap each piece in a fig leaf and tie with twine to secure (it's ok if the fish isn't completely covered). Roast 15 minutes.
_________________________________